Deep Dive

Masquerade’s gameplay is a mix of simple puzzles and more action-focused parts with dangerous lights.
Our main mechanic is a wheel, sometimes upgraded with a selector part, allowing the player to rotate the décor around them. We also have a push-pull mechanic and red projector-lights that kill you if you’re seen.
This page is gonna spoil the whole game as it’s a behind the scenes, so play the game before reading!!
Since it is my first multi-month project with a team bigger than two, a lot happened during development. This article (like all the others) doesn’t have the goal of being exhaustive, but this page still will be very, very long.
Now if you’ll allow me, buckle up. It’s time to dive right in the development of Masquerade!!
1) Production – Overview
I arrived in the project after the pre-production was finished, so I actually wasn’t there when the main mechanics and decisions were made.
Upon coming into the group I instantly took some responsibilities: Task-repartition, documentation, making Designer meetings to make sure everybody was up to date, etc.
The “official” Lead switch happened in December.
That’s a long-winded way to say “I don’t really know how we arrived at these main mechanics, but my role as a Lead was to build the game upon it“.
1) Production – Writing
The narration of the game has evolved a lot from September to May. Initially, we had much more presence from other characters from the original story: Tybalt, Mercutio, the Nun was the one guarding the tower as she is Juliet’s protector…
Mercutio would act as a tutorial and Tybalt as an in-play opponent, as opposed to the Narrator who was out of the plot.
Juliet was supposed to be very sick, and the Narrator (back then named The Count) was a “Faustian Bargain”-type of character, offering a cure for her state: Turning her into a puppet to make her technically “not sick”, and then kidnapping her to force Romeo into the Theater.
In the end, we simplified everything a lot to turn it into an abduction and “save Juliet” without any extra fluff.
Early draft of an introduction cinematic explaining the Sickness plot, by Zayn CARDOT.
There also was a lot of debate about the ending of the game: Should Romeo be able to win? Should he die? Maybe even kill himself like the original story?
In the end, we went with an ambiguous ending where Romeo lost but we do not know what his fate is exactly. A story with Romeo and Juliet cannot end well, after all.
The whole script was written in English first, with drafts given by Nathan, and tweaked by Mathëys & myself. The final betrayal speech mainly was my writing, along with the majority of the French translation (thanks to Zayn and Mélina for the help on that though!!).
1) Production – Puzzles and Design
On the first day of production, we started a puzzle brainstorming.
The idea was to have one concrete puzzle idea per beat of the game, with each décor having its associated challenge, determining a first difficulty curve with tutorials, and placing emotional intentions at each step.
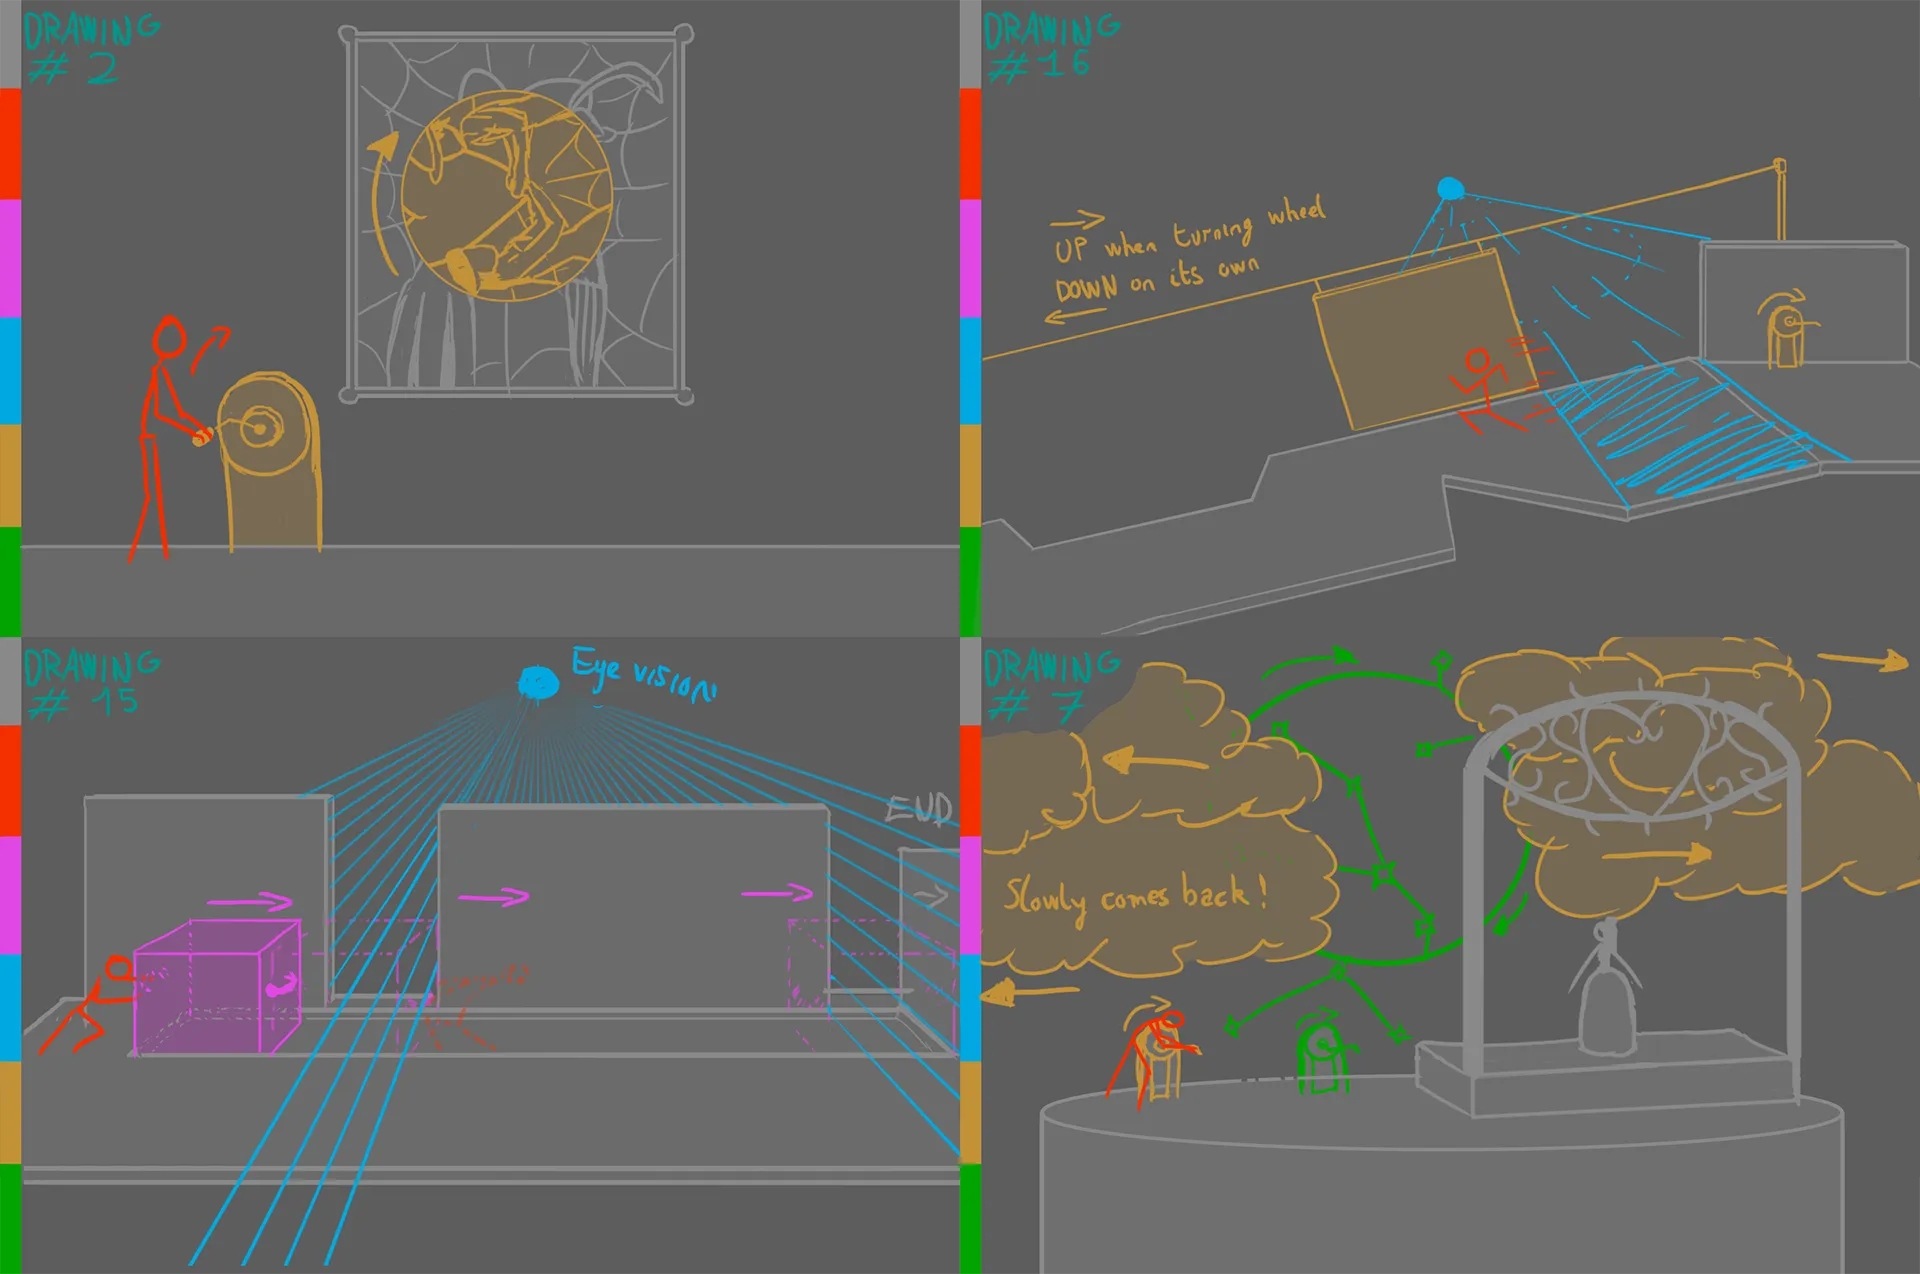
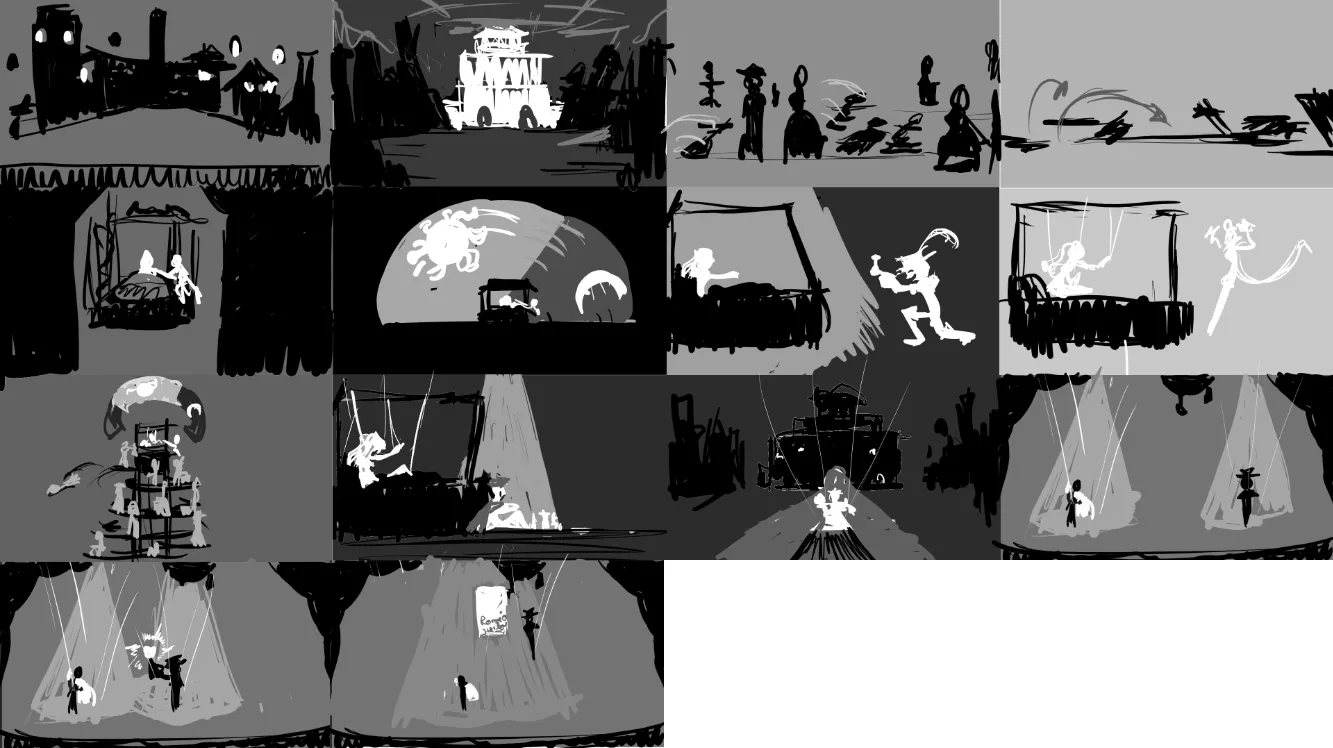
Some of the original idea drawings I did. The colored bars are the Key of the drawings: character in red, wheels in yellow and green, eyes in blue, pushable objects in pink.
Our main workflow was to put an emphasis on “Spectacle”, our keyword for the project: Easy-ish gameplay, lots of moving parts and feedbacks everywhere for every action.
We tried as much as possible to make the player move the décor itself, to increase the immersion and presence of the Theater, but also because it showed the “Spectacle” aspect, and it’s visually interesting.
Earlier in development, we wanted to have “Secondary Interactables”, small objects that don’t do anything except a feedback when interacted with (or getting close to): A cord that lights up a décor far away, a birdhouse with a cuckoo that pops out… But they ended up being cut.
Fun Fact: Those “Secondary Interactables” got cut, but we kept the books and candle pack that activate when Romeo gets close!
Birdhouse proof of concept, it actually got coded, but we never made proper meshes nor placed them around the levels.
1) Production – Technical Design
There are two big Technical elements that I worked on and that I want to talk about here: the Camera and the Trigger Boxes
The Camera has four main modes of player tracking: “Act One”, “Simple Spline”, “Strict Spline” and “Box Roam”. All of them were created to solve specific constraints in precise situations.
The “Act One” side view moves from side to side following Romeo’s movements, with slight yaw to simulate the head rotation a spectator would do to look around.
Immersion is still a big goal for the game, and this camera was tweaked many, many times to have a result that feels good to look at and play with, especially the lens distortion and height placement.
Act One view in-game. The camera is not static but it’s aiming to recreate the feeling of observing a play from the view of a Spectator.
“Simple” and “Strict Spline” modes force the Camera to follow a spline, but the movement depends on different parameters: “Simple Spline” tries to follow Romeo’s movement with a simple distance-acceleration algorithm, while “Strict Spline” moves directly alongside Romeo depending on a predefined Path, with a one-to-one ratio between Romeo’s movements and the Camera’s movement.
Splines are used many time in-game, for example this “Post-Chase” part needed specific camera movement to go above wooden beams and make some specific shots; so it uses the “Strict Spline” mode.
“Box Roam” is the main camera mode for the Backstages. It’s a box, offset from Romeo and following him around, where the Camera tries to stay. When Romeo moves enough and the camera is outside of this box, it moves to stay within it.
The size of the box allows the Camera to not do micro-adjustments when Romeo slightly moves, for example side to side.
There is no collision check to make the development time for this feature way faster, so we often have multiple Box Roam offsets per room to manage both sides of walls.
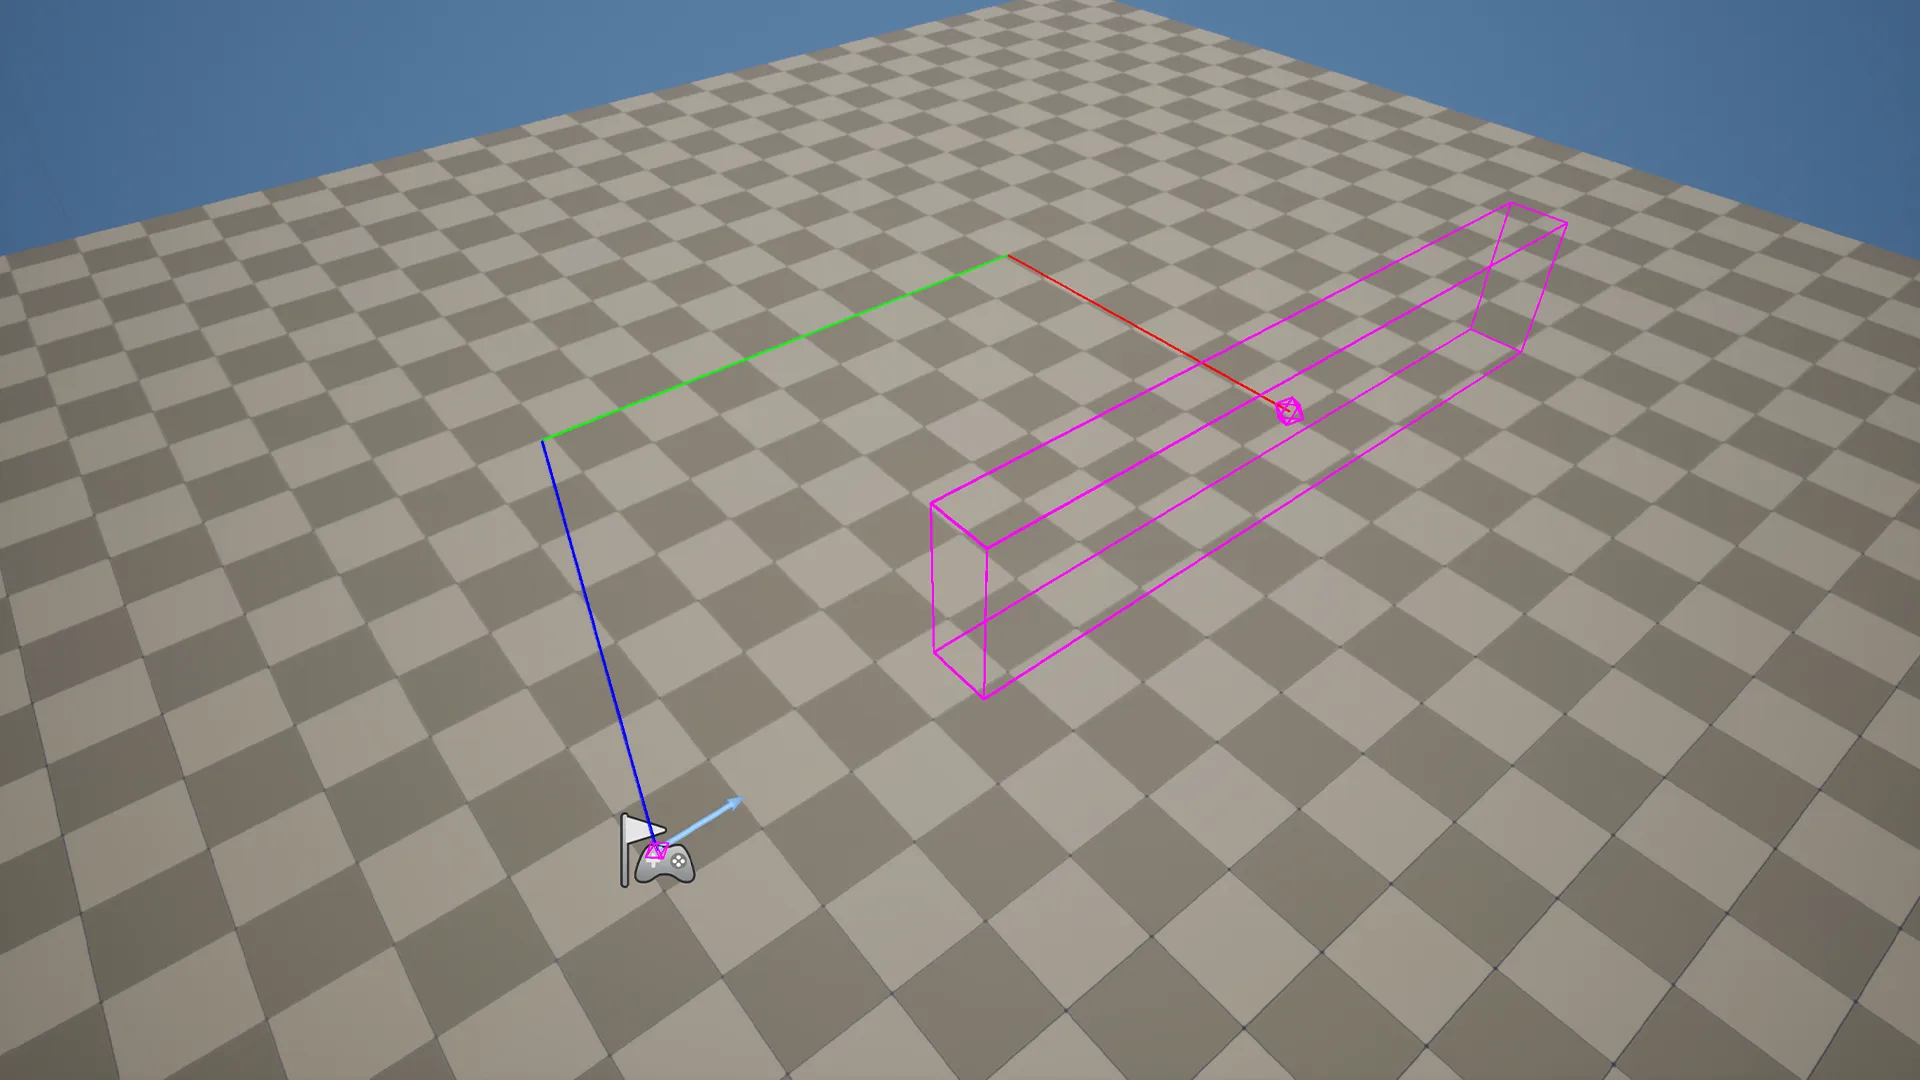
Visualization tool of the Box Roam offset and size, the pink diamond represents the center of Romeo and the box is the zone where the Camera tries to stay.
All of those camera modes have the ability to gain custom curve-defined Camera Shakes, random idle movement and rotation to keep it lively, a secondary target to keep both Romeo and something else in view, or an “Interaction Zoom” that zeroes in onto the target of a Gameplay Interaction, to focus specifically on the player effects.
All of those “FX” as I call them are additive and can be toggled independently in the camera settings or depending on the situation in-game.
They all are directly linked and controlled by the next system: the Trigger Boxes.
The same environments with and without the Trigger Box shown. Color-coded and explained for all of them so it’s easier to understand, mostly.
This is a system I’ve developed back in mid 2024 for TERMINUS, another ArtFX Graduation Project. It’s a single Blueprint Actor with a detection box that can be oriented as you wish, colored, named, seen in-game, with many debug features.
Its core is found in the Components, individual behaviours that can control lights, modify a camera parameter like focal length or Box Roam offset, kill Romeo to act as a death plane, launch a dialogue or cinematic directly linked with the Narration Manager, call an EDH event, or many many more…
Each one of those Components can be triggered individually when entering and/or exiting the Trigger Box, with additional delay if need be. The entirety of our play field is covered in many, many Trigger Boxes—by far our most used tool/system from a design standpoint.
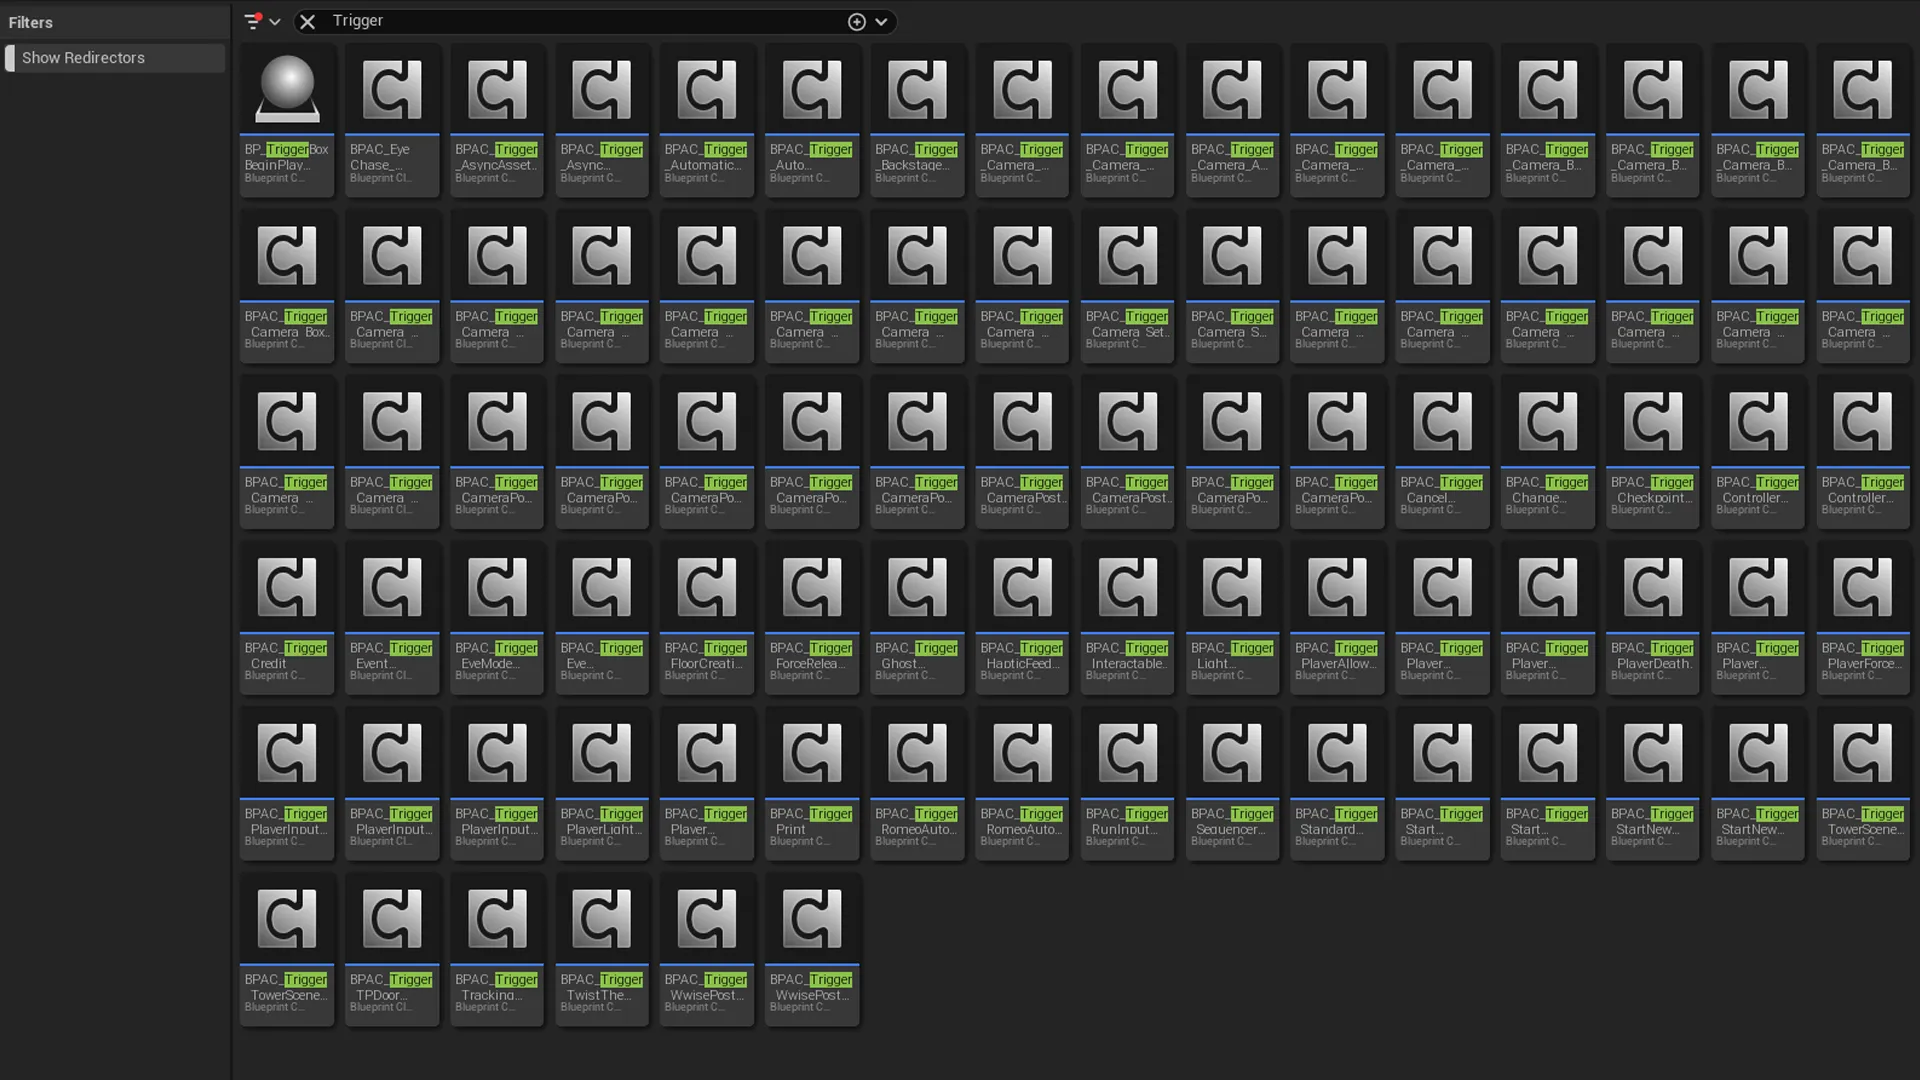
Overview of all Components in the project files. All are prefixed with “Trigger” to be found easily.
1) Production – Accessibility
Throughout development, and from the start, I made sure that we paid close attention to the accessibility side of the game as in my opinion this is a big marker of care towards players. We planned for cutscenes to be skipped, for subtitles to be present, for both French and English translation of the game (and UI), etc.
One aspect in particular that I’m very proud of is our settings menu:
We have the usual split volume sliders of course; but we also have descriptions for every single provided setting, and an entire category dedicated to Accessibility and Ease of Play:
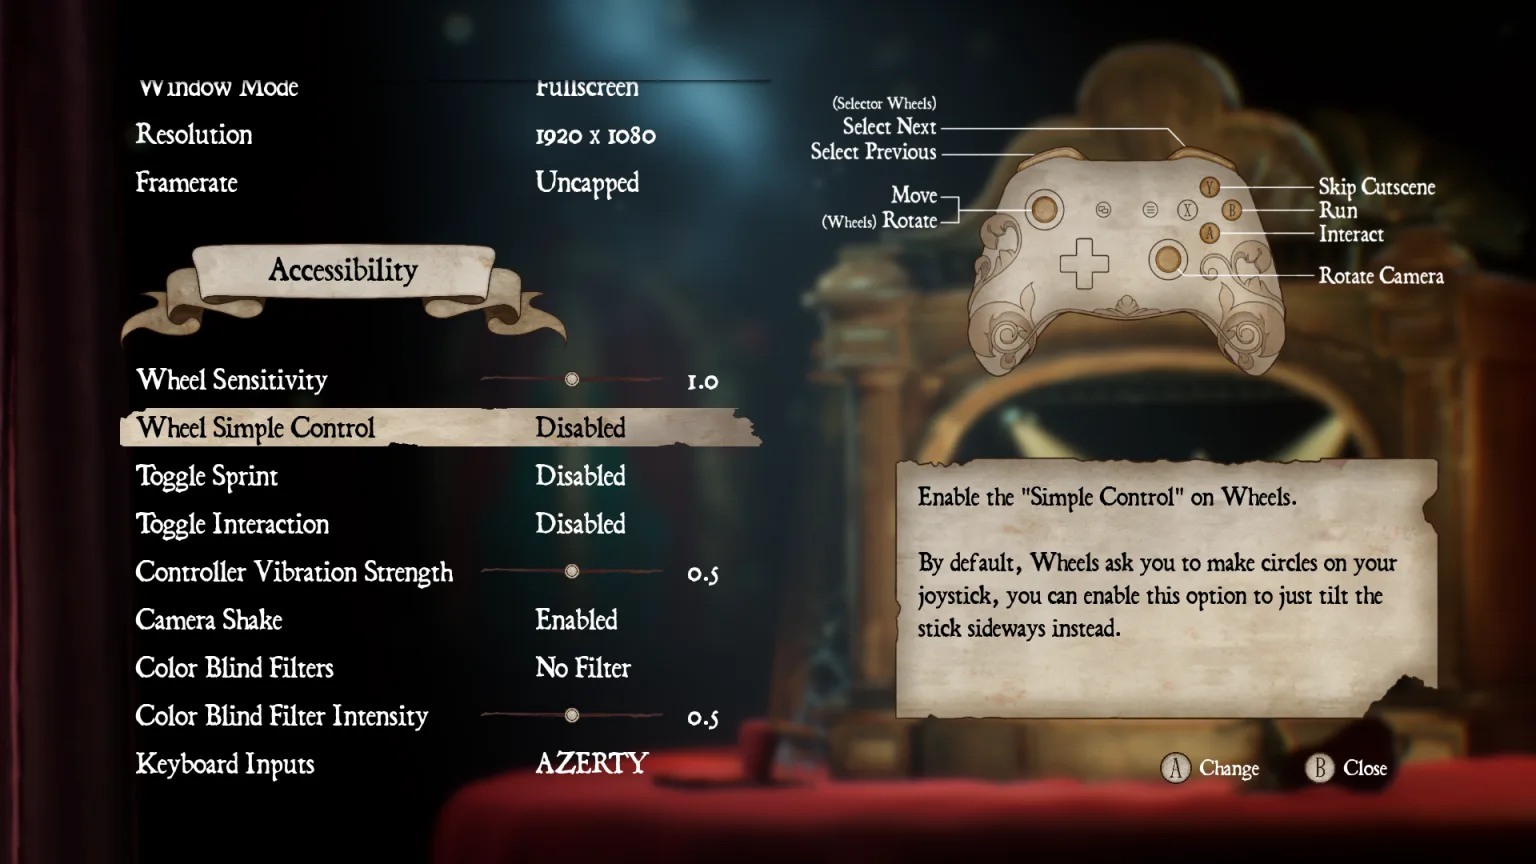
Accessibility category of our settings menu, as seen in-game.
The Wheel rotation is purposefully a challenge, you need to make circles with the joystick to rotate them (thank again Cyril for your work on this feature!).
This decision posed an accessibility challenge for some people, so we added the option to enable a Simple Control, where you just tilt the stick to the left or right instead of rotating.
One specific “accessibility” feature (that’s more a gameplay feature, but still) is the option to play in AZERTY or QWERTY, with the tooltips updating in-game.
This also changes the visual controls image in the top right of the menu or when interacting with objects, which have a different version depending on the Language (French or English) and the Input mode (Controller, QWERTY, AZERTY).
Tooltips for the Selector Wheel, they adapt to the keyboard language or controller to ensure minimal friction for the player.
Speaking about tooltips, we decided to have control tooltips stay for the whole game whenever you’re interacting with an object despite potential immersion or artistic constraints.
Whether you’re making somebody else play mid-game, got distracted for an hour or two, or you’ve made a pause without closing the game, there are endless reasons why you might want to know the controls in-game after the tutorial.
It’s been long enough, let’s walk through the game now, there’s way more to talk about!
2) Act I – Concept, City, Ballroom
From the earliest stage of pre-production, Masquerade was imagined with the “Theater Out Of The Box” concept: start on a Theater stage, playing scenes, before leaving the stage to go 3D.
The stage part became Act I, and its design is linear, with a flat camera and limited one-dimensional movement on a spline.
We start the Act with “CityGate”, a mix of the previous City and Gate scenes from earlier in development. The movement and interaction introduction of the game, it needed to be really simple as to not overwhelm the player while they learn the controls.
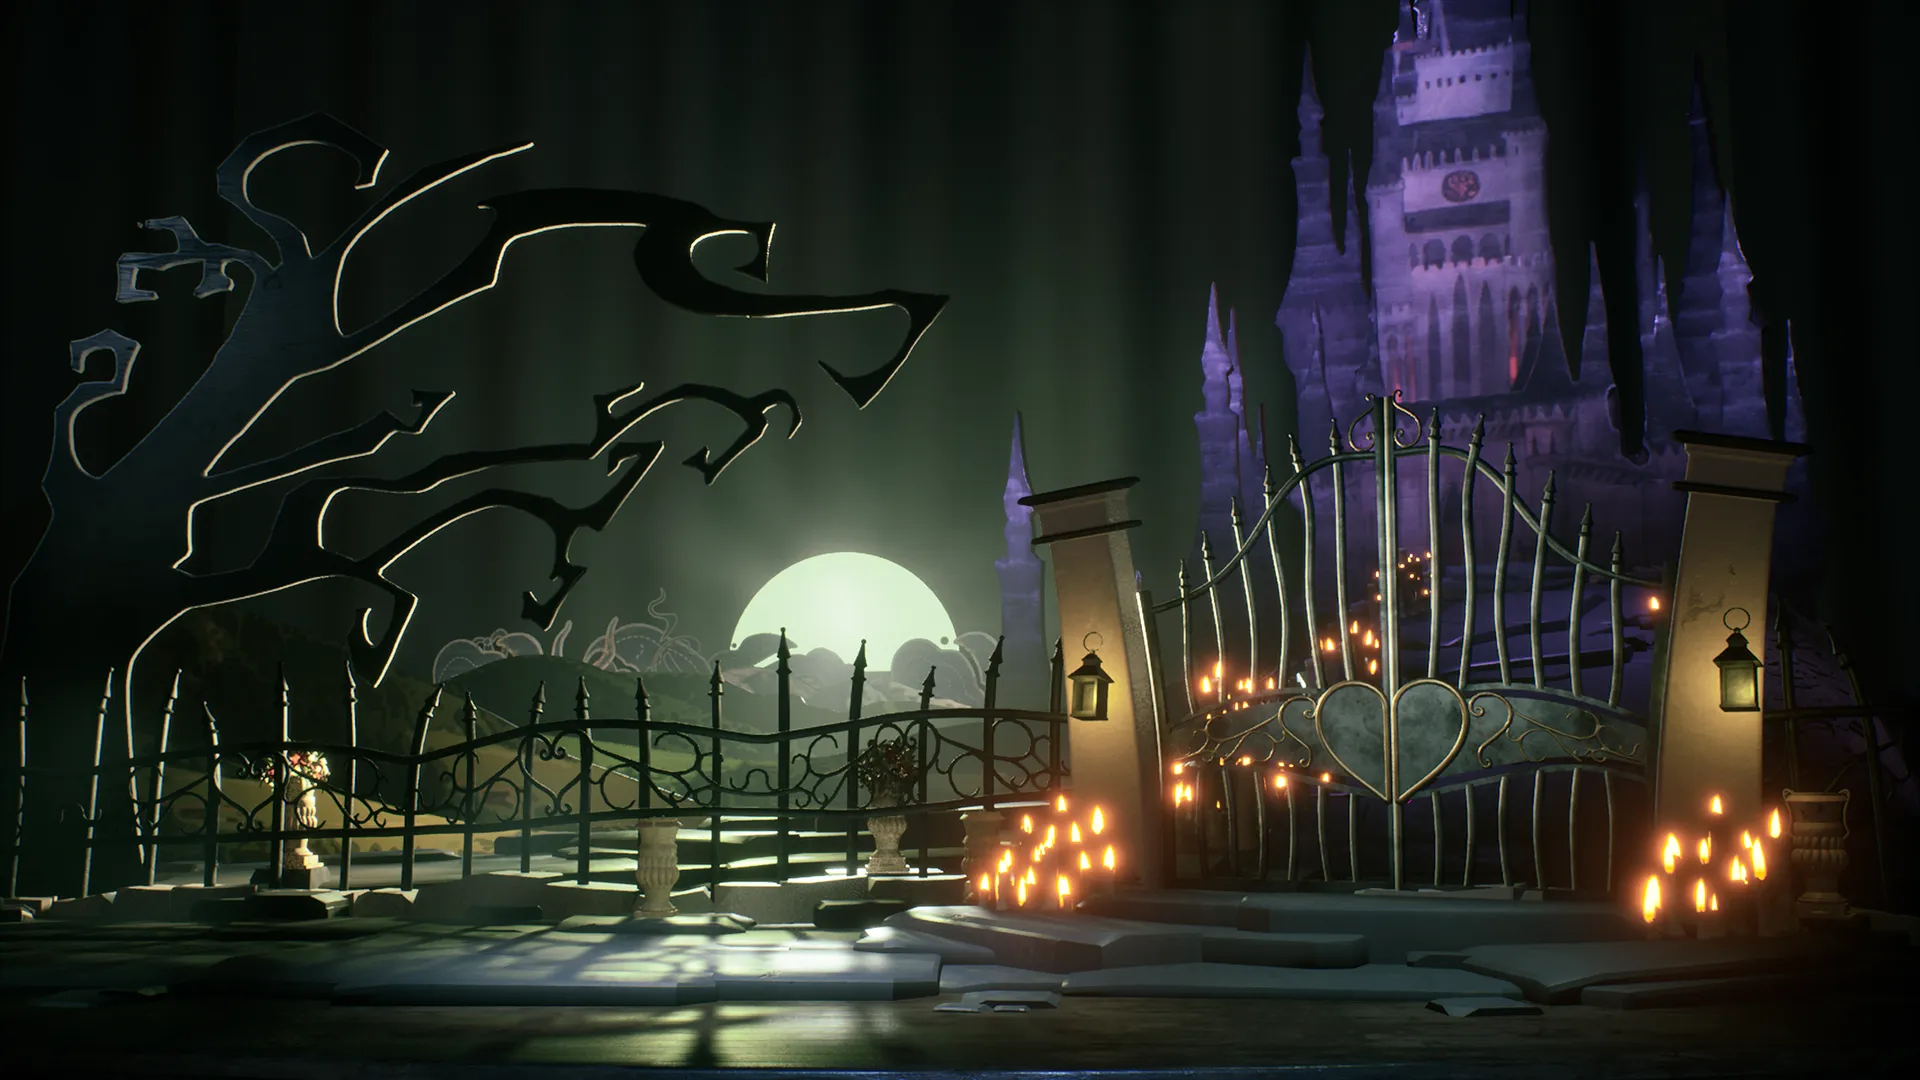
City Gate as it appears in the final game. Eerie and uninviting as a sign of what’s to come…
Starting the game with a close-up of Romeo was a way of showing the protagonist and allowing for more immersion. It’s also why the Narrator doesn’t appear too early: we need to show Romeo’s motive before any complication.
The first dialogue gives all of the information necessary to progress to the next scene): We are Romeo, searching for Juliet, in this mysterious and worrisome place.
The player is given empty space before the first interaction to test the controls and movements of Romeo, and the tooltips give all the necessary information to open the gate.
The real game begins at Ballroom A, the following scene:
Ballroom A lighting up post-puzzle resolution. The first intended “Wow effect” of the game.
Ballroom A is the introduction of the Narrator and the short-term goal “Finding Juliet”, but also the introduction of the Wheel, our main mechanic.
The decision to have the lights being out was threefold:
> Maintain the offsetting ambiance started with CityGate, the scene appears more dangerous in the dark.
> Focus strictly on the Narrator and the Wheel mechanic, no extra distraction visible.
> Make the Narrator appear less powerful: Romeo is the one making the lights turn on with the puzzle.
Ballroom B is next, and it is one of the most important scenes.
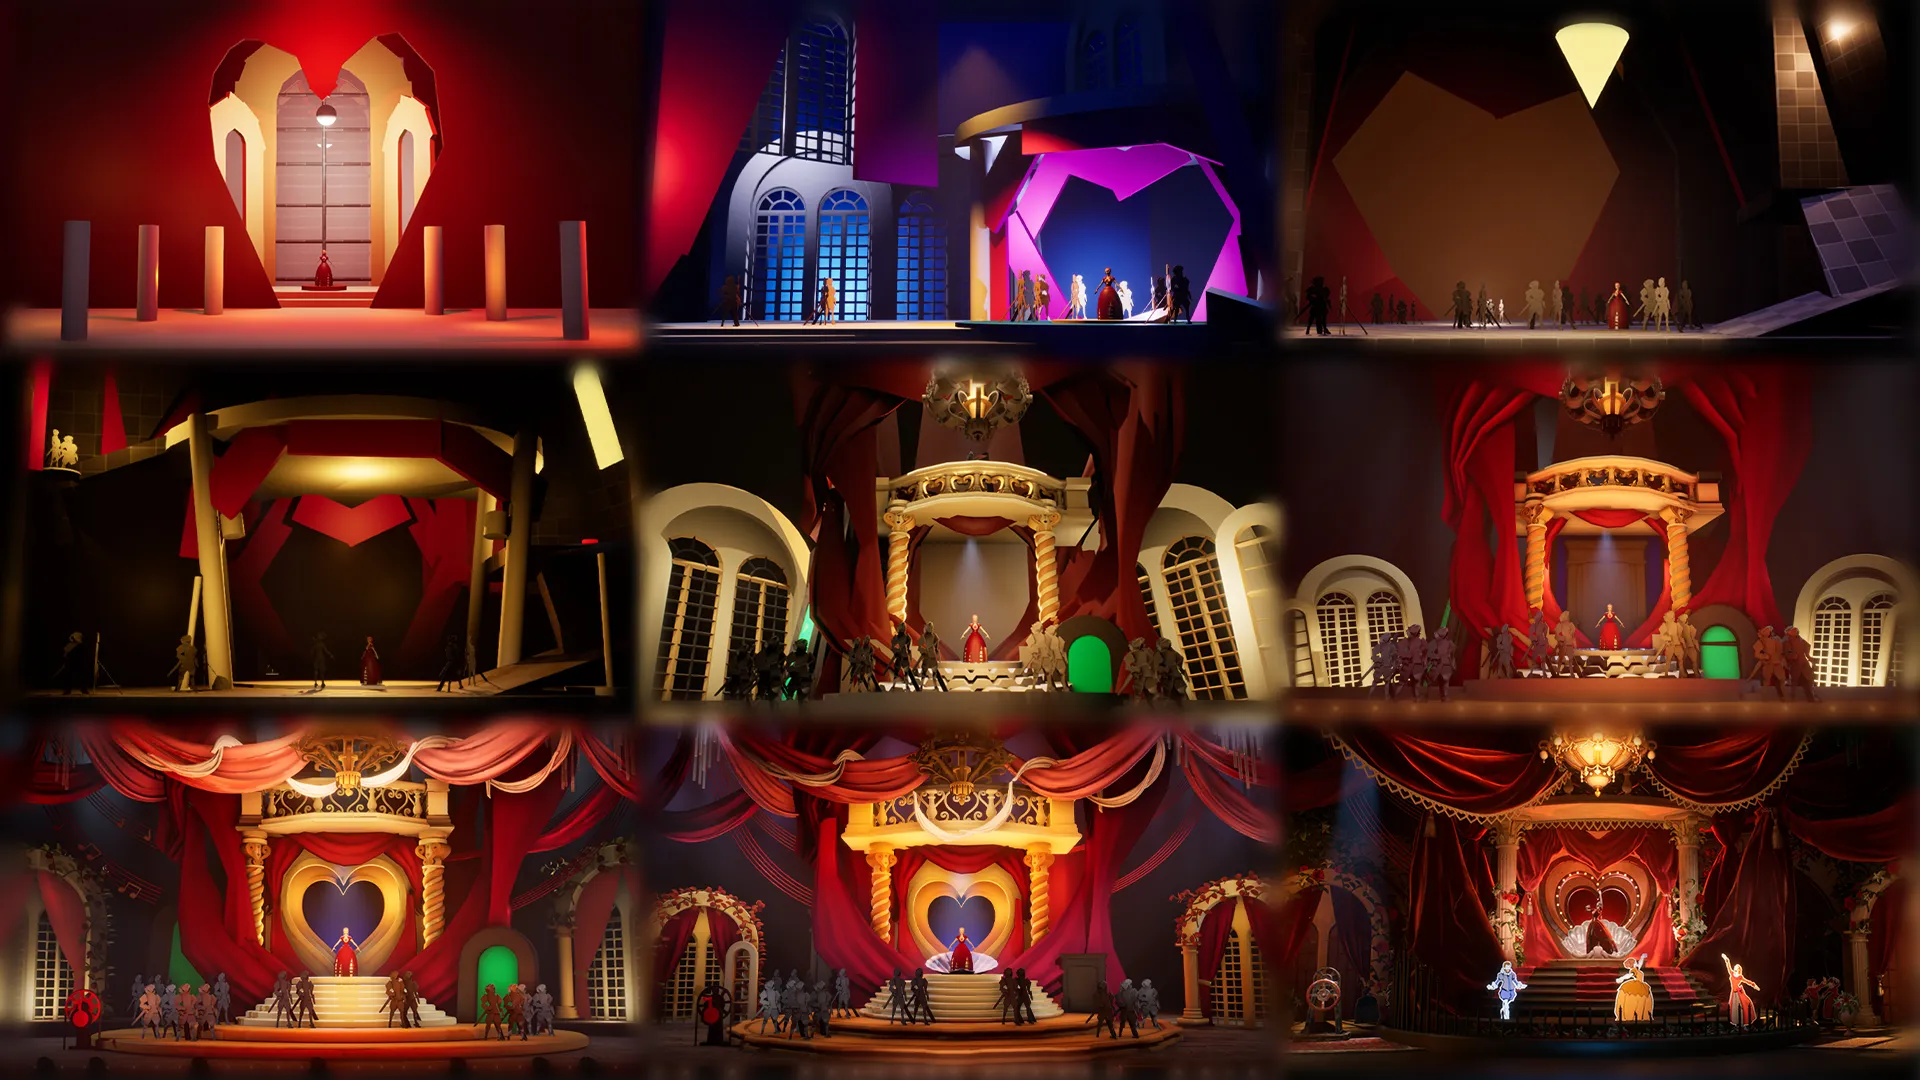
Visual evolution of Ballroom B over time, it’s by far the scene with the most iterations.
Introduction of Juliet, callback to the Ballroom scene of the original story, the first “real” puzzle of the game, a change of tone from fear to love to fear again, setting up the actual goal of the game being “Finish the play to save Juliet”…
Ballroom B has many, many crucial roles in the game.
From a gameplay standpoint, Ballroom B also has been the puzzle with the most iterations, at least five whole different concepts tested just for this scene. Hearts or Dancers were always the two central ideas, but none really stuck the landing…
Every time a puzzle including dancers was playtested, the players would say “Oh, I thought we needed to align dancers by making pairs”. So we turned the puzzles into exactly that!..
A lot of work was necessary to make the puzzle readable and understandable for as many players as possible, though the idea still has its faults.
We’ll do better next time!
2) Act I – Garden and Tower
Garden A is the introduction of the danger in the game: the red lights or “Eyes” as we call them, but also a narrative rest after two heavy story-focused scenes.
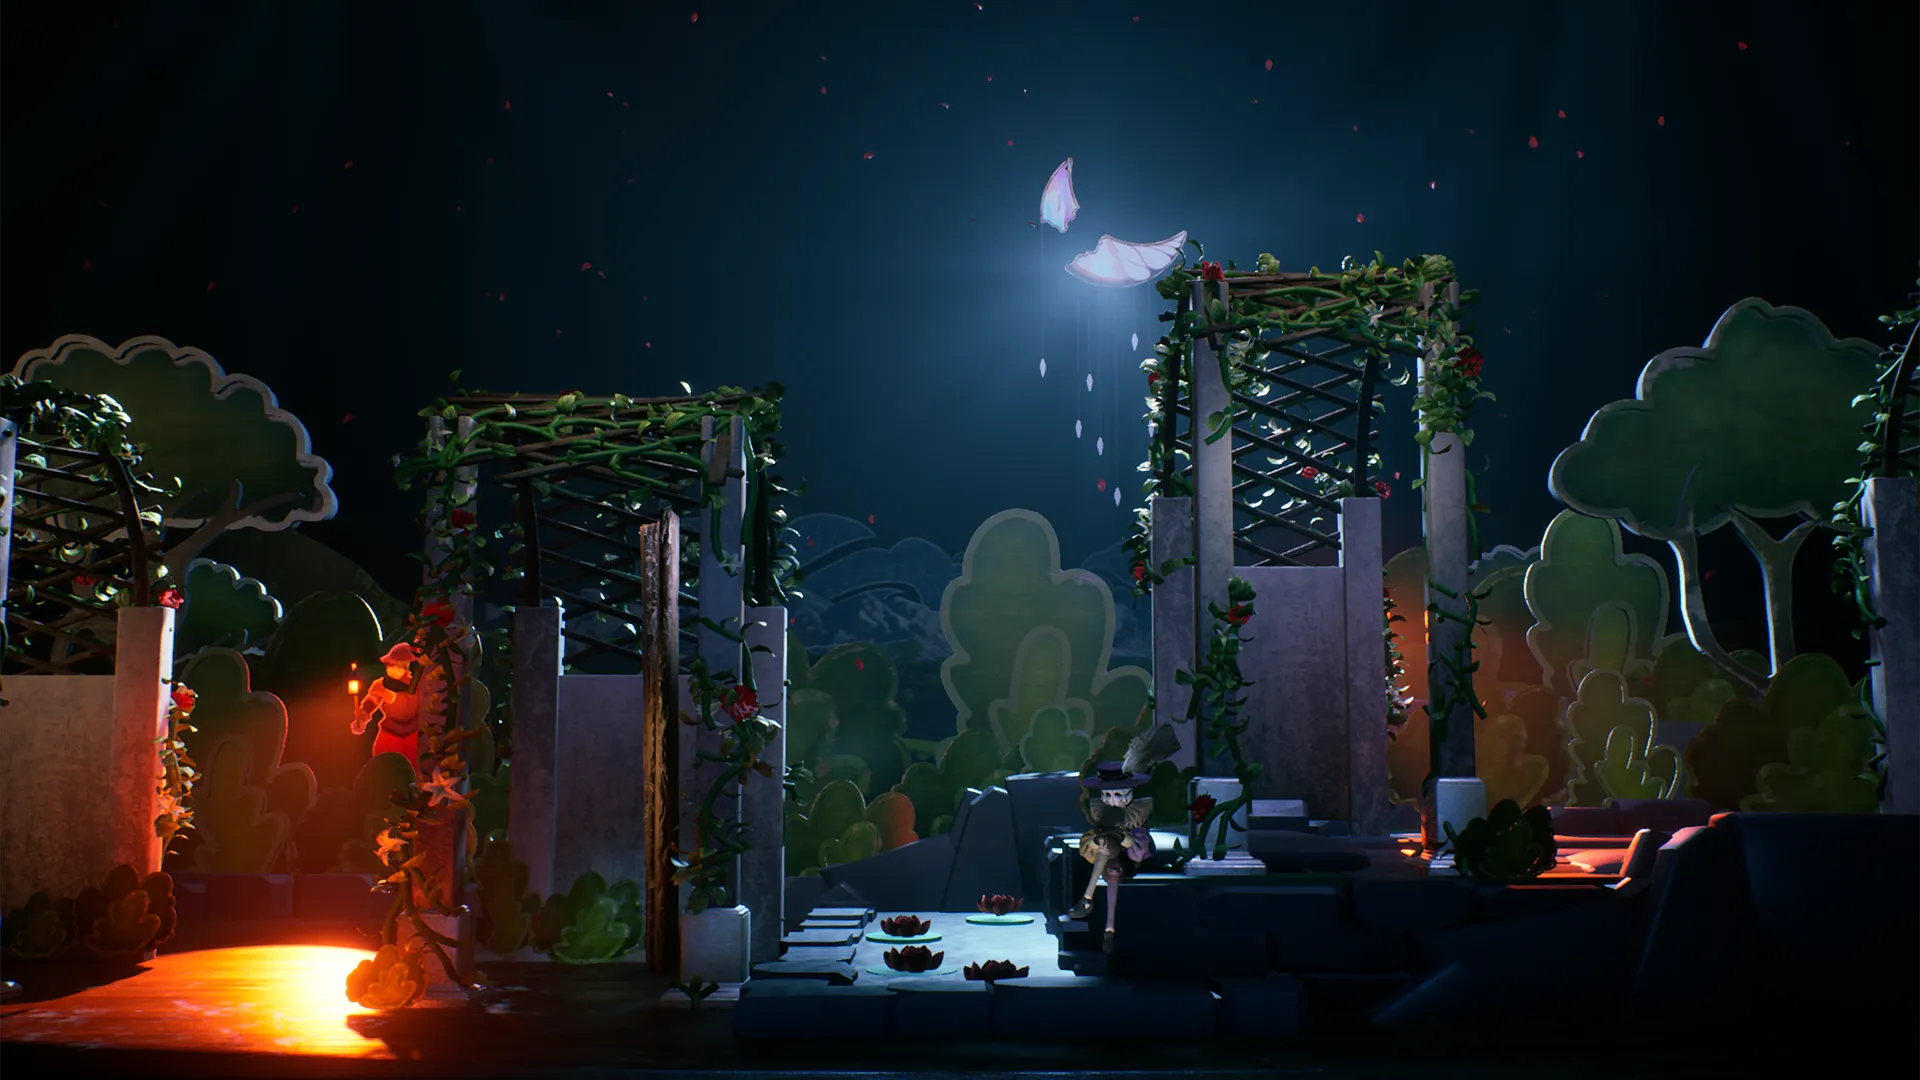
Garden A, a concept that arrived way later in development compared to the other Act I scenes.
Garden B introduces the Selector Wheel, the “upgrade” to the wheel that allows us to create more complex puzzles. It’s not the easiest system to get used to as a player, so we needed a simple entire puzzle to introduce it.
The placement and rotation clamps of the wheels is done so the players try many solutions to solve the puzzle but naturally see that they don’t work. This leaves them in a “okay, what else can I do?” state where they hopefully notice the controls for the lever, or try other controls and find the button themselves.
The sky fan was a proposition from the Game Artists to add more scenery and spectacle to the scene, this is another puzzle that evolved quite a bit during development.
The sky fan opening, a big “wow” effect for players.
Tower Climb is the next scene, and the obligatory “break the mold so much that half of its code is specifically done just for it” sequence that’s needed in every game; but the result is well worth it.
The rain VFX is something I prototyped myself in October because I wanted to see what I could do with it, and it worked so well we kept it until release… That’s fun I think.
We also added lightning strikes, with four random variations in lengths and pattern. They turn off lights on the front of the tower and also affect Post Process settings such as Chromatic Aberration, Saturation or Contrast to produce a bigger impression.
Video of Tower Climb being played in-game, with all of its effects.
The final scene of Act I is Tower Top, the transition to the Backstages and the separation with the Narrator. This needed to be another “wow effect” scene, so we went all in: Constellations (hand-picked for their link between their mythology and the story), rotating star trails, concentric circles with lighting-up stars, and an ending cutscene.
Initially we had a much more violent camera shake animation, simulating the camera stand breaking down and the camera being held by a single point, with full three-axis rotation around that pivot point; but Romeo fell into the tower, so it felt more natural to have the camera follow him, and we cut the original animation.
The original cutscene animation, I’m really proud of how it looks as this was my first ever “complex” animation work!
2) Act I – The Wedding Room Floor
This is where Act I ends, at least in the current version of the game!
Originally, we had one last scene in Act I: Wedding. Taking inspiration from the original story, the Wedding was the pivotal point in the plot.
We followed the script more closely back then, and Romeo’s goal was to avoid sharing his Shakespearean counterpart’s demise, with proper comparisons and references to the original play.
Getting married to Juliet would seal his fate and future death, so you arrived in Wedding and had to get out by moving a wall out of the way.
Wedding transition blockout done by Percy VUTIDECHKAMJORN
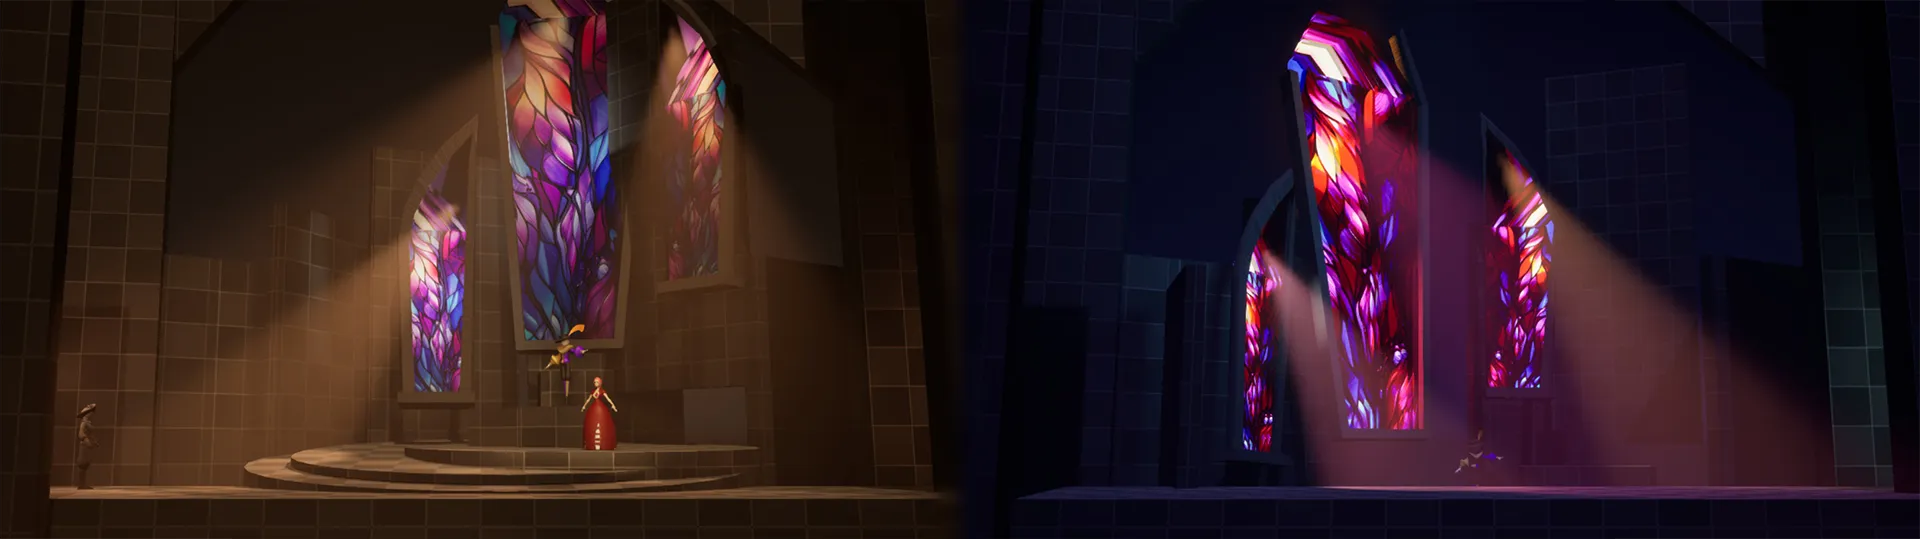
This would have been accompanied by a real-time transition of the scene. While Romeo stayed on the left side, the light would be warm, and the stained glass standing high in the scene.
By moving to the right, the light would get darker and more somber, the whole scene would rotate, and the stained glass would lower, revealing a coffin shape.
Due to time constraints, this scene ended up being cut; but it can live on through this article at least!
3) Act II – Concept and Narrator
Act II was always supposed to be the backstages, but they changed so, so many times during development.
The first layout was way more focused on toying with the player and their expecations.
You would start with an Exit door in front of you that was a cutout and fell down as you approached it, with a corridor shrinking as you got closer to it. The entire corridor would then rise up quickly and its walls would fall, revealing an empty void with giant gears rotating in the background, very far away.
Old beginning of the backstages, with the falling walls. It’s a very early draft, obviously.
We also had “Storage”, a room where cutouts as well as piles of inanimate Narrator bodies would be stored for “in-between plays”.
This whole journey was changed due to a different narration, and more complete art concepts, turning the backstage from a giant void to this more rundown “factory” feeling that reused pieces of previous scenes.
3) Act II – Chase and Hide
Coming back to the current version of the game, let’s quickly move through every noteworthy puzzle in order.
The chase when exiting the entrance room is there to introduce the Eyes for good: the killing red lights that are the main antagonist of this part of the game.
A lot of time was spent on the introduction of the Eye, making sure it was visible beforehand to recognize the danger, understanding that it chases you and that you need to run (with the help of the tooltip), making it feel organic and not too robotic with its pathing, etc…
The Eye has an idle animation before the chase starts, to give it an organic feeling.
After some walking we arrive to Push & Hide, one of my favorite puzzle and the first real use of the Push & Pull mechanic in the game. It’s a simple concept: move crates to hide behind and avoid the Eyes.
It’s voluntarily deceptive in its third light: the majority of people will arrive here with only one crate and try to cross the light with it, but you actually need to bring both in here.
Technically, this puzzle is doable with only one crate if you very precisely place the box and move through specific lines, but it’s outside of a casual reach so we left it. Speedrunners gotta speedrun and we support them for it!
Push & Hide’s last light, the trap that everybody falls into. Notice the two lines of rails that cross the light to help guide the player towards the goal.
We go through the Elevator fall and arrive at Twisty Tunnel, an idea from Ludovic that almost never came to be, but we wanted it so badly that it stayed. It’s definitely one of the “wow” effects of the game so having it is very important for the Spectacle.
Then, Tower part II as the players call it, but our development name was “Sonic”. Inspired by old-timey boss battles from old 3D Sonic games like Sonic Rush or Sonic Rivals that took place on a circle where you spun around the boss, I imagined a section of the Act III chase where you turned around an eye that was at the center of the circle.
It got moved to Act II and used the Tower as its centerpiece, for better visual effect.
The rain particles in here are modified versions of my Niagara system that I used to learn Niagara Scratch Pad. It was my first use of custom Niagara code and a good learning experience. The rotating cylinder effect of the rain curtain was too important to pass!
“Sonic”, or “Hide & Rotate” as it’s called in the game files.
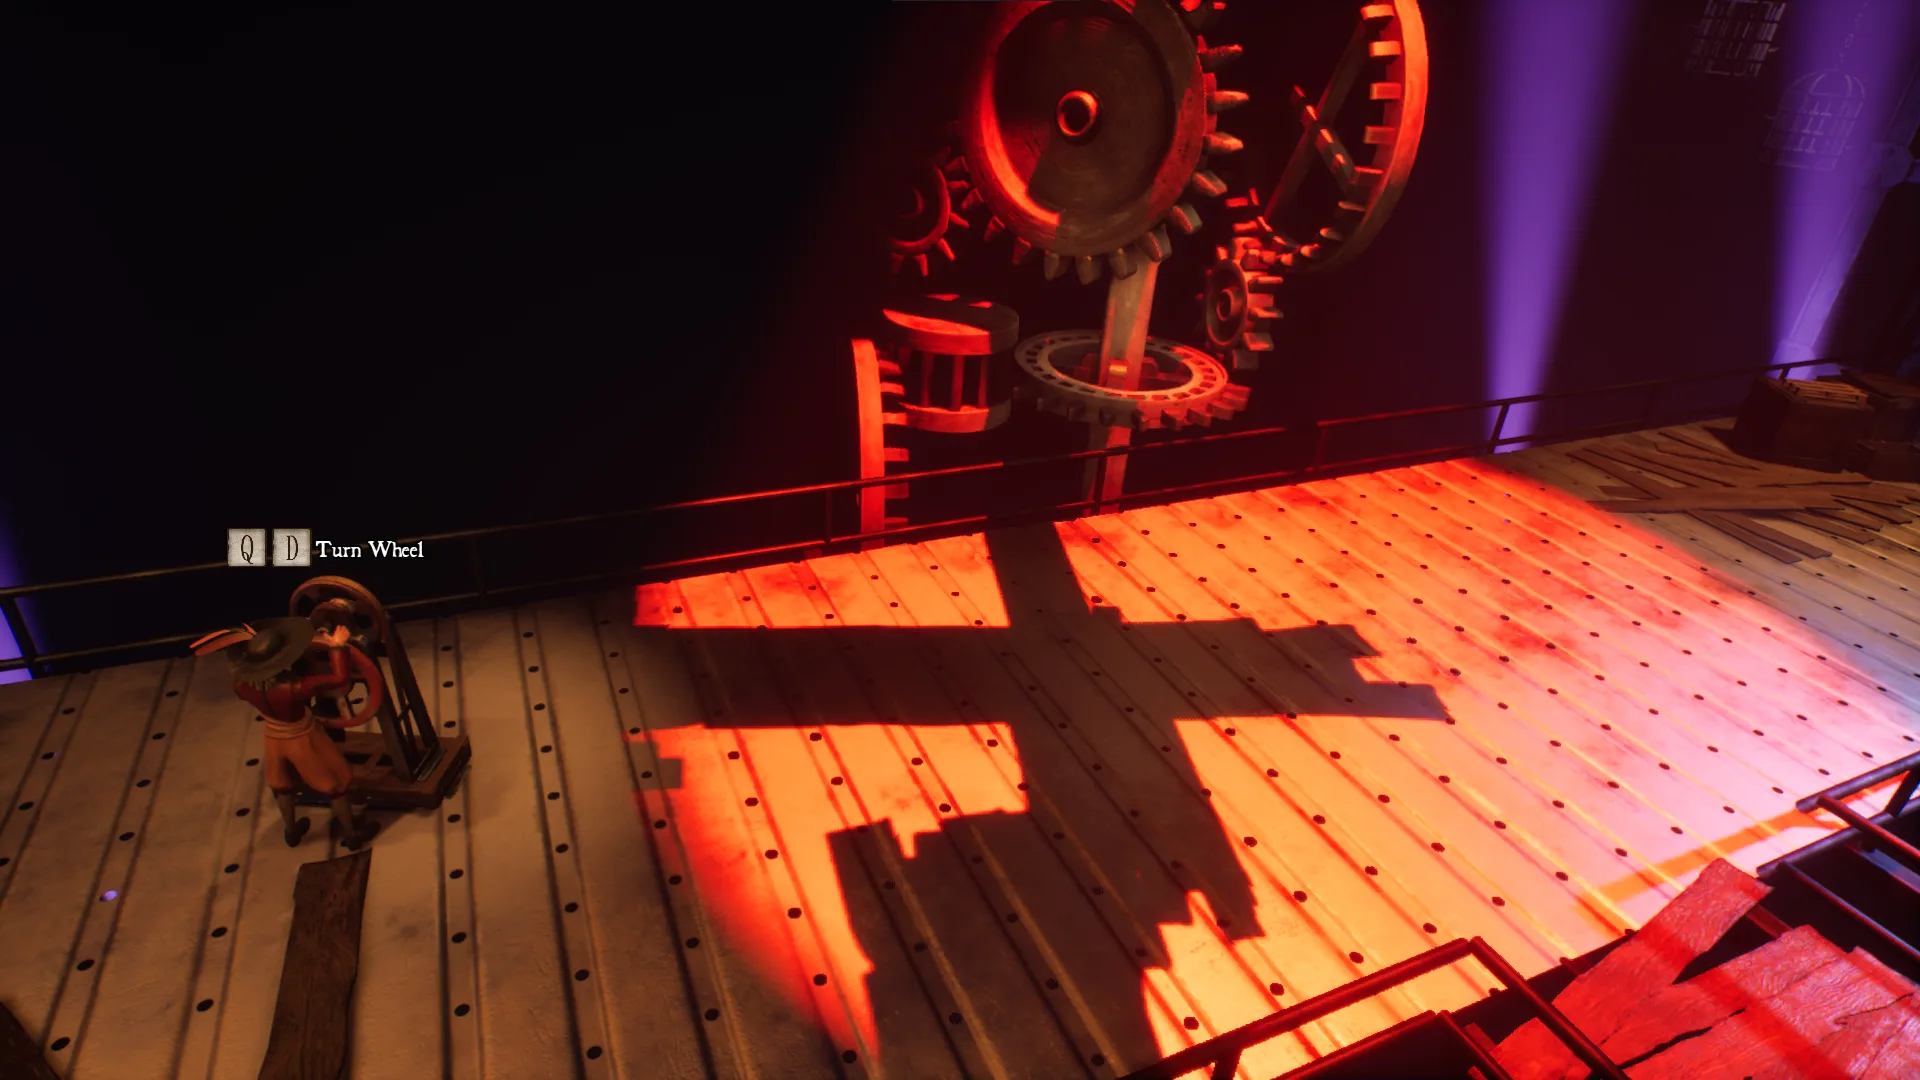
The next puzzle is a fan-favorite, “Shadow Path” as we call it asks players to rotate a wheel to project a shadow onto the ground for them to walk on, doing it twice in a row to cross the light.
This is an idea that was proposed by one of our teacher and supervisor, that we tweaked and adapted to make it fit in-game.
We’ve got two more “Interactive Traversal” coming up: Spinning Platform and Falling Catwalk.
The Backstages are alternating between gameplay with Wheels or Crates where the player must think more than move (Entrance stained glass, Push & Hide, Shadow Path) and places where the way forward is just made interactive and more interesting without much puzzling to do (The crate pushed in the void before the Chase, the Elevator, Falling Catwalk…)
They help keep the player on their toes and prevent a “walk simulator” effect throughout the backstages, in-between the pretty scenery and interactive puzzles. They also allow “Spectacle” to come back more often and more easily.
It’s easier to make things move around you when you’re also moving than when you’re static and trying to think about how to push the crates in a specific way.
Spinning Platform or “Tourniquet”. If you stay in between the center and the edge you literally cannot get hurt, but with the surrounding chaos you don’t see it. Players use the middle safespot when eyes come towards them but not all of the time, making this challenging but fair in their eyes.
The static light in the background was to encourage players to come forward, making camera work and staging easier on top of keeping Romeo visible all the time.
Finally, “Move Move Move”. Another fan favorite and one of the few ideas that stayed in the game from the first brainstorm: Lift up a painting that blocks the light and run alongside it downhill while slaloming between angular catwalks and holes in the floor.
Its placement at the very end was intentional following the “energy” curve of the Act: From slowest (Push & Hide, Stained Glass) to fastest (Sonic, Spinning Platform, MoveMoveMove). This is all to prepare for Act III and its faster pace, while having a more natural progression.
Move Move Move in all its glory.
3) Act II – Move through a Labyrinth
As with many ideas in this game, a lot didn’t end up making the cut of the game (if the article until now didn’t explain this enough).
Before entering Act III, let’s finish with the backstages and plunge through archives of cut concepts!
Starting with… the start, Tunnel of Love was an alternative entrance for the Backstages, placed just before the current one.
Inspired by Orpheus’ mythology, we wanted to add some Charon symbolism with “descending into Hell to save your love” being a big parallel. To add to the general “spectacle”, the art team though of a Tunnel of Love, being on a small boat and traversing through a sea of broken puppet parts. Though since there was no real gameplay and it asked for a lot of specific assets it was deemed technically unnecessary.
Fun Fact: This “Hell Symbolism” is the reason why some of Romeo’s voicelines talk about “Fire and Brimstone” and “Hellish twists and turns”.
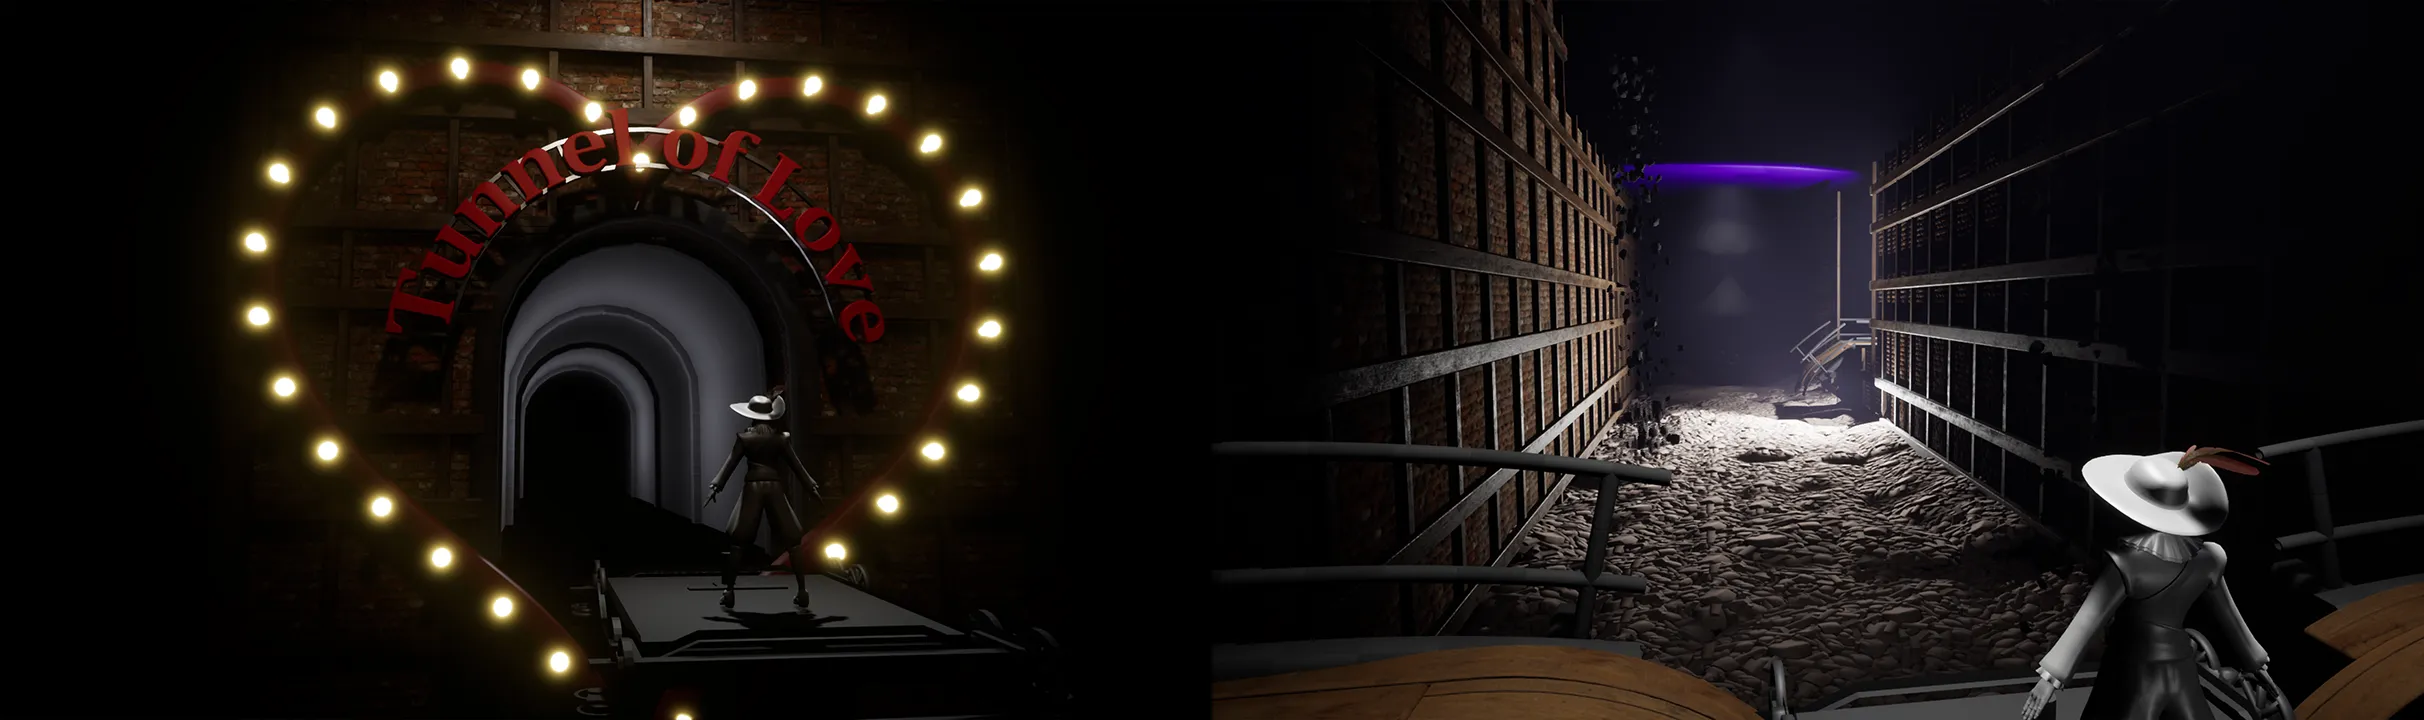
We don’t have video footage from this development stage, so here are some blockout screenshots of “Tunnel Of Love”, done by Nathan MERCIER.
This also allowed for a VERY smooth camera transition, as we started in an Act-I like side view and followed Romeo around corners to reveal a fully 3D environment. Sadly this was lost with the cut, but the 2D-to-3D aspect of the first two acts still exists.
Another big cut was the Labyrinth. You had a three-circle concentric puzzle to re-create a path that you then needed to cross while Eyes roam the labyrinth. A one-two punch of puzzle then traversal.
Camera work around the Labyrinth was actually very tough: rotating the camera around would disorient players, it could clip through walls with the idle movement we added, placing it higher than the walls would make everything look ridiculously small, and lack of collision detection didn’t help.
Many players stood dozens of minutes on the concentric circles without understanding what to do or how to do it.
This whole endeavor plus the art nightmare of trying to put an environment on a level design that changed every week (and the need to cut puzzles to meet the deadline) was enough to convince us all to cut it.
Sometimes, when an idea just doesn’t work, it’s better to cut it than keep trying to bodge it in.
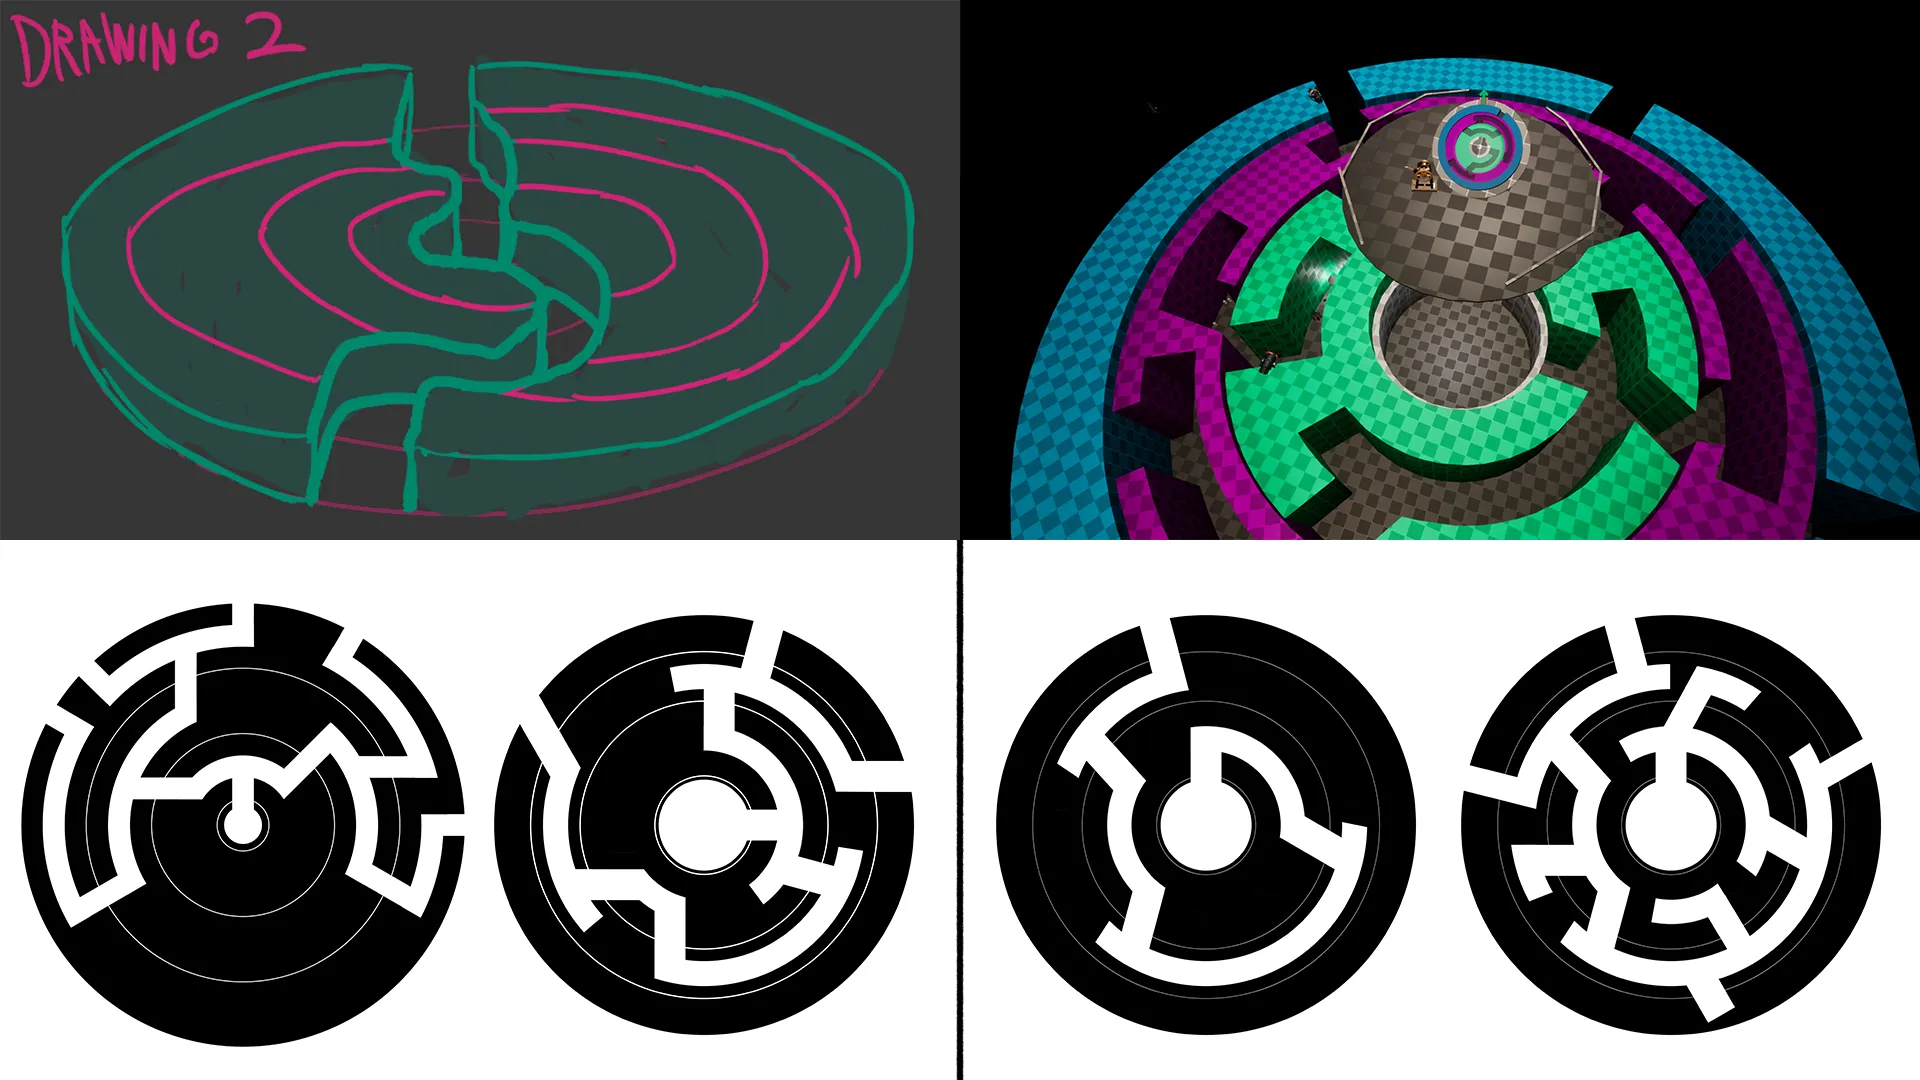
The Labyrinth’s many different iterations and ideas. Top-Left is the original concept drawing, Top-Right is the latest look before scrapping. Bottom-Left shows two original layouts for the labyrinth, and Bottom-Right shows the latest layout with the left one being the “minimap and right path” and right one being the real labyrinth you move through with all its dead ends.
Lastly, let’s do a rapid-fire round before reaching the end of the game!
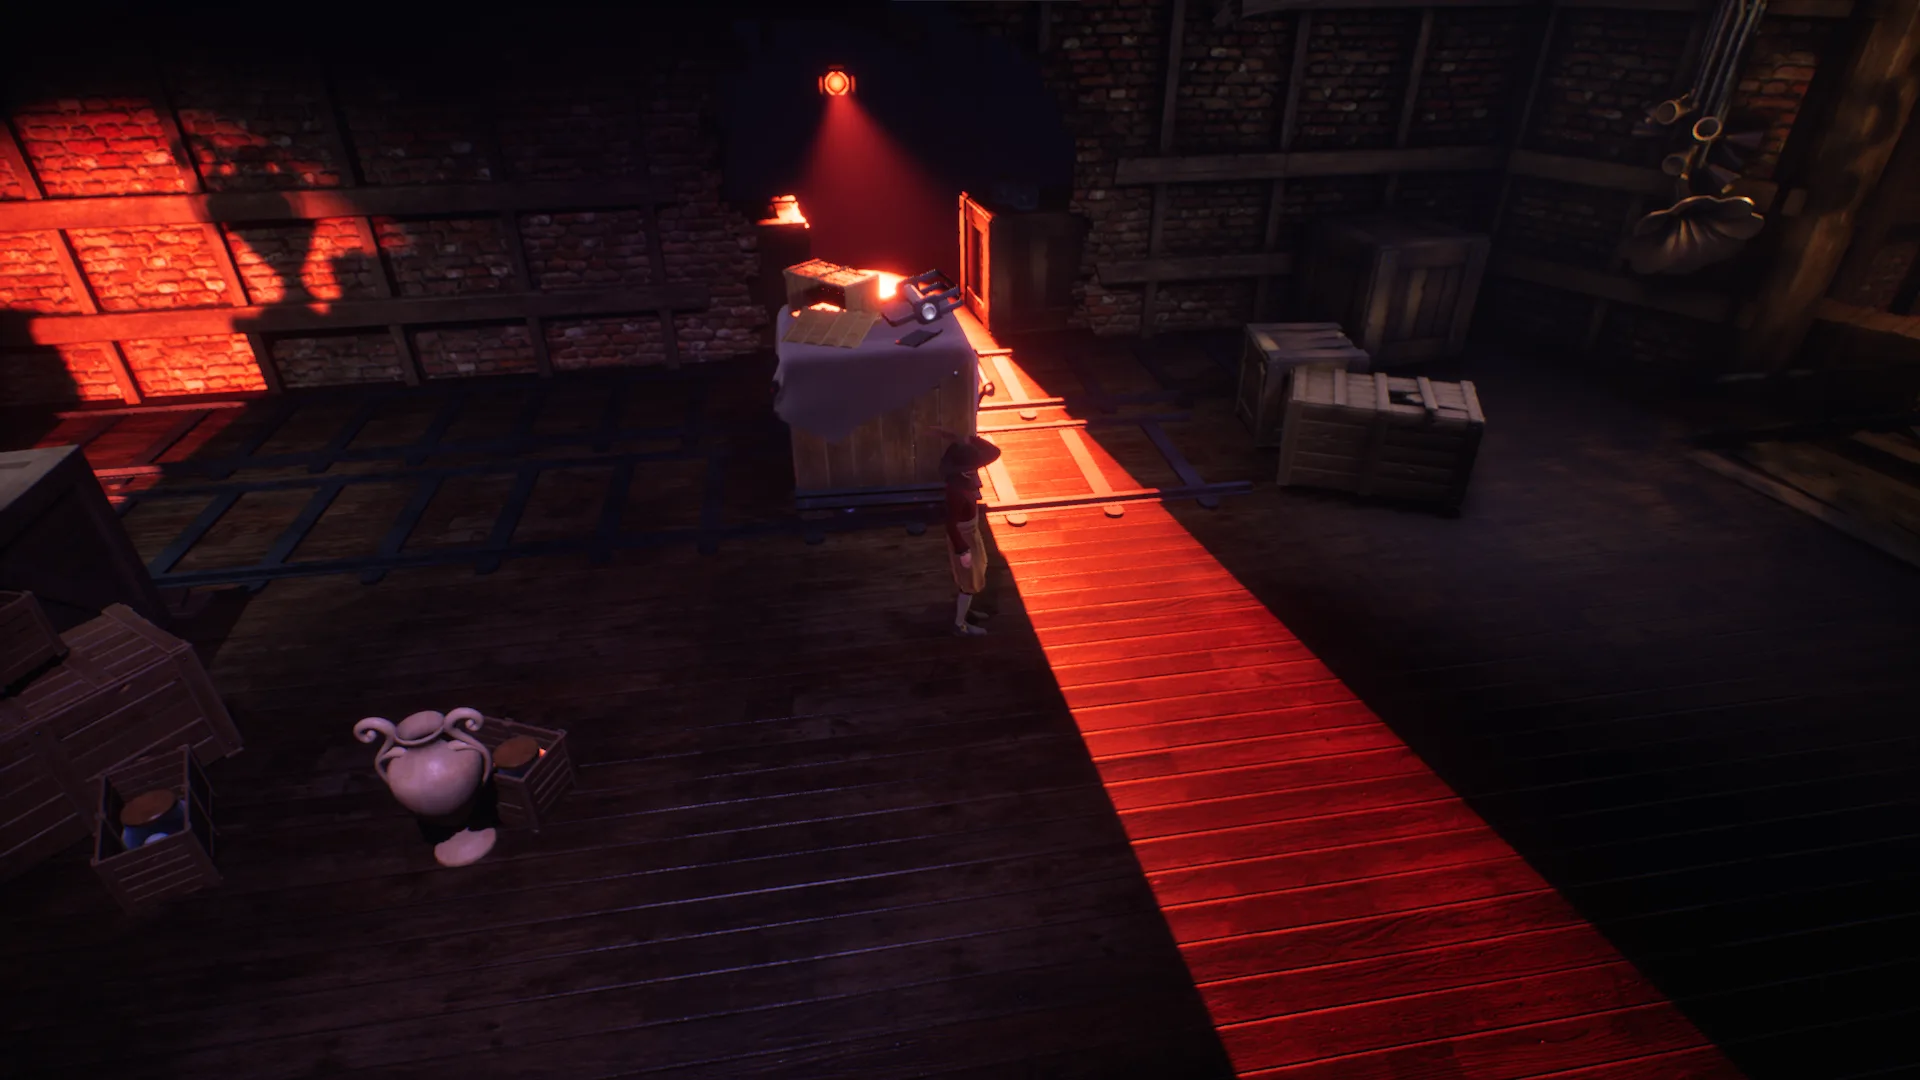
One idea in the old old backstage setting was to have a giant room themed around an “escort mission” of sorts, pushing a lit brazier around in a dark room as our only source of light. It was held on a rail that we needed to reconstruct using rotations, pushing, and counterweights everywhere, but was cut as the pushing system didn’t allow for such dynamic routing.
Initially, while in the “void” design concept of the backstages, they would have been isolated islands that you move to using TP doors. Small doors with individual curtains that teleported you from one to the other. One was even supposed to be attached to the Move Move Move platform that fell downhill!
But when pivoting towards a more grounded and connected design, they got removed.
Some other cut puzzles included pushing walls and floors around a crate to make it fall into a hole and complete the path; or rotating an inner platform in sync with its outer part, which would then complete the puzzle and open the way.
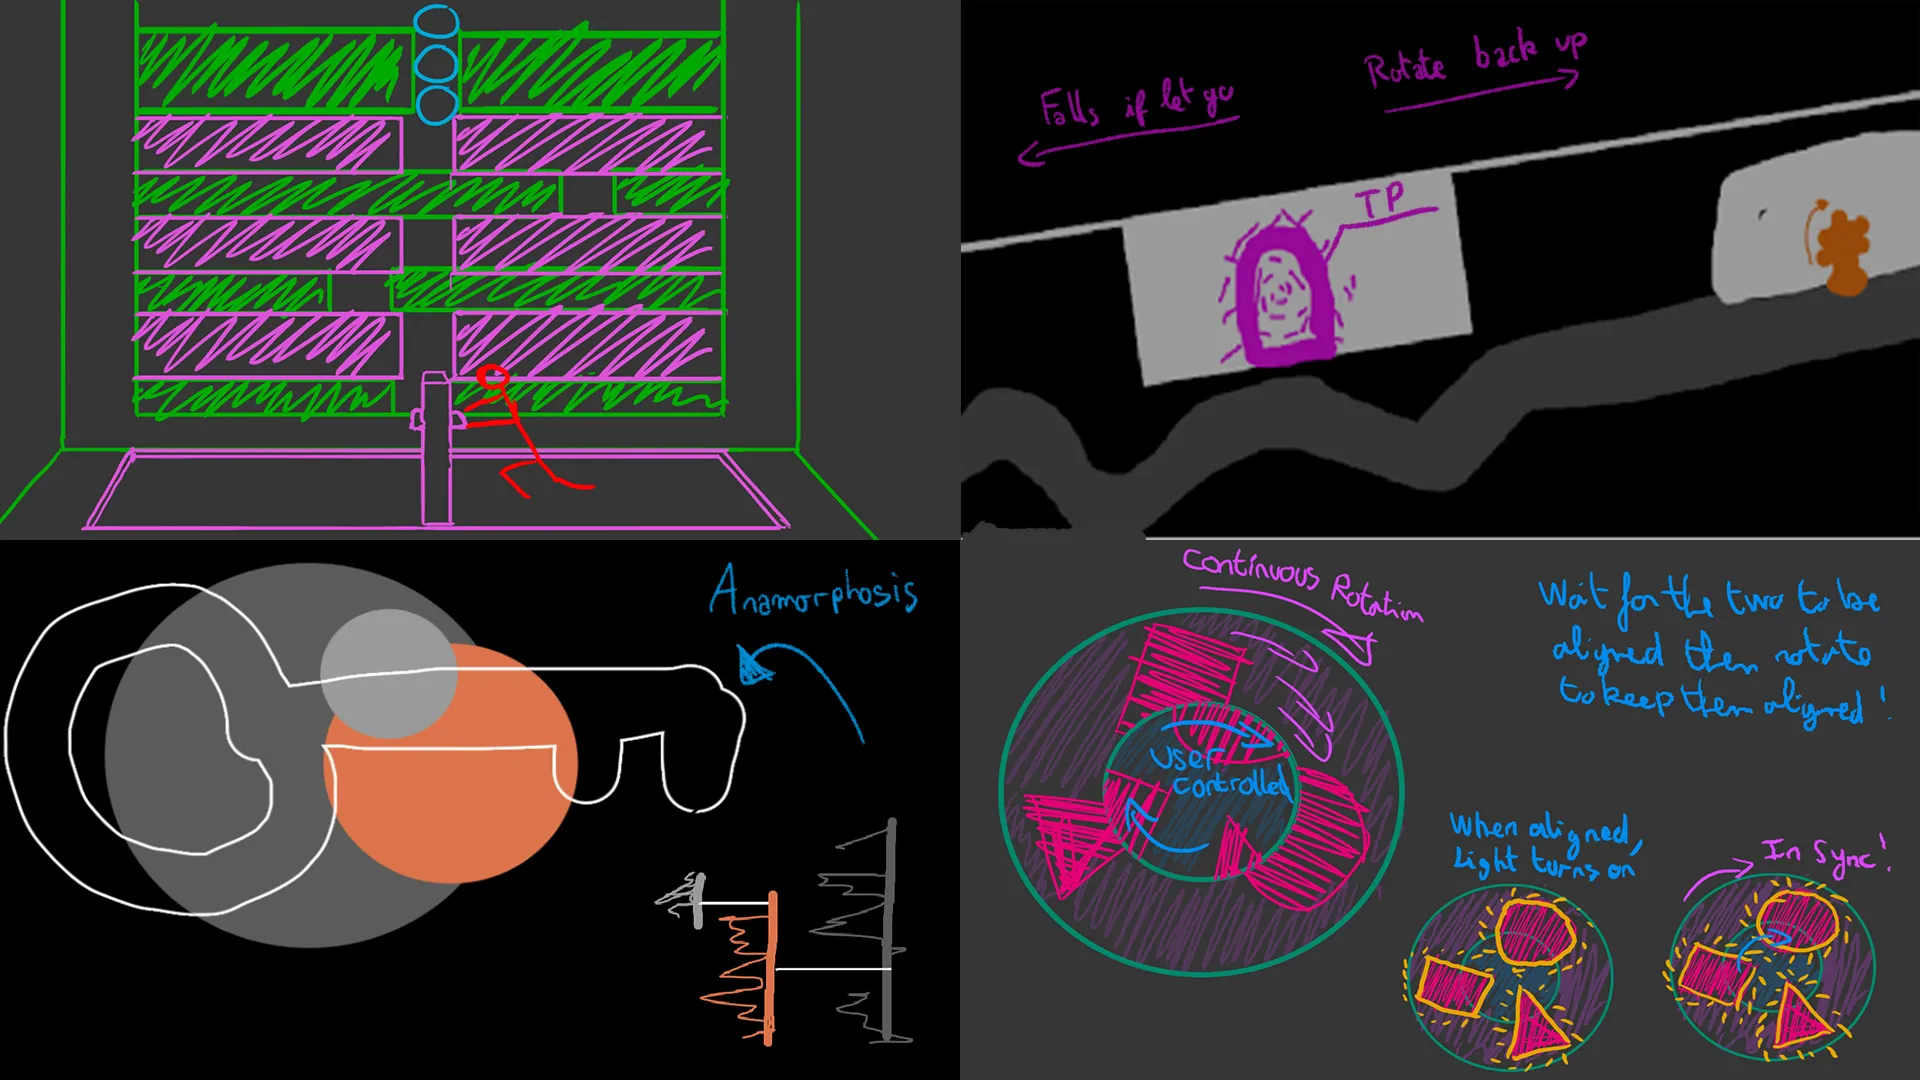
Drawings for the different concepts I did back in September: Marble Crate, Move Move Move with a TP door on it, Anamorphosis with multiple rotations and Synchronized Rotations. The Brazier didn’t have a drawing so it’s not shown here.
4) Act III – The Act Three Supercut
Act III is the end of the game, the part after the Narrator’s betrayal until the end of the game.
Initially, this was its own level, with half a dozen different puzzles and challenges. It was supposed to be in a giant, vertically infinite theater (kind of like the current one) where you used frozen-in-place theater chunks to rise up in the air for a while.
On top of Floor Creation and Undyne (our code names for the two current challenges), there were also:
> A huge theater-wide concentric circle puzzle placed on the ground, rotating the seat rows to recreate a pattern and free Juliet from the cage. This would have released her but also made the cage rise upwards. At this instant the Narrator would reveal the betrayal and the goal was to get to Juliet by climbing the debris.
> A “train” where rotating the wheel would make it move forward or backward, and you had to dodge swinging chandeliers while climbing up.
> An uphill climb with Eyes that rush downwards, and you hide behind covers that fall onto the path at the last minute.
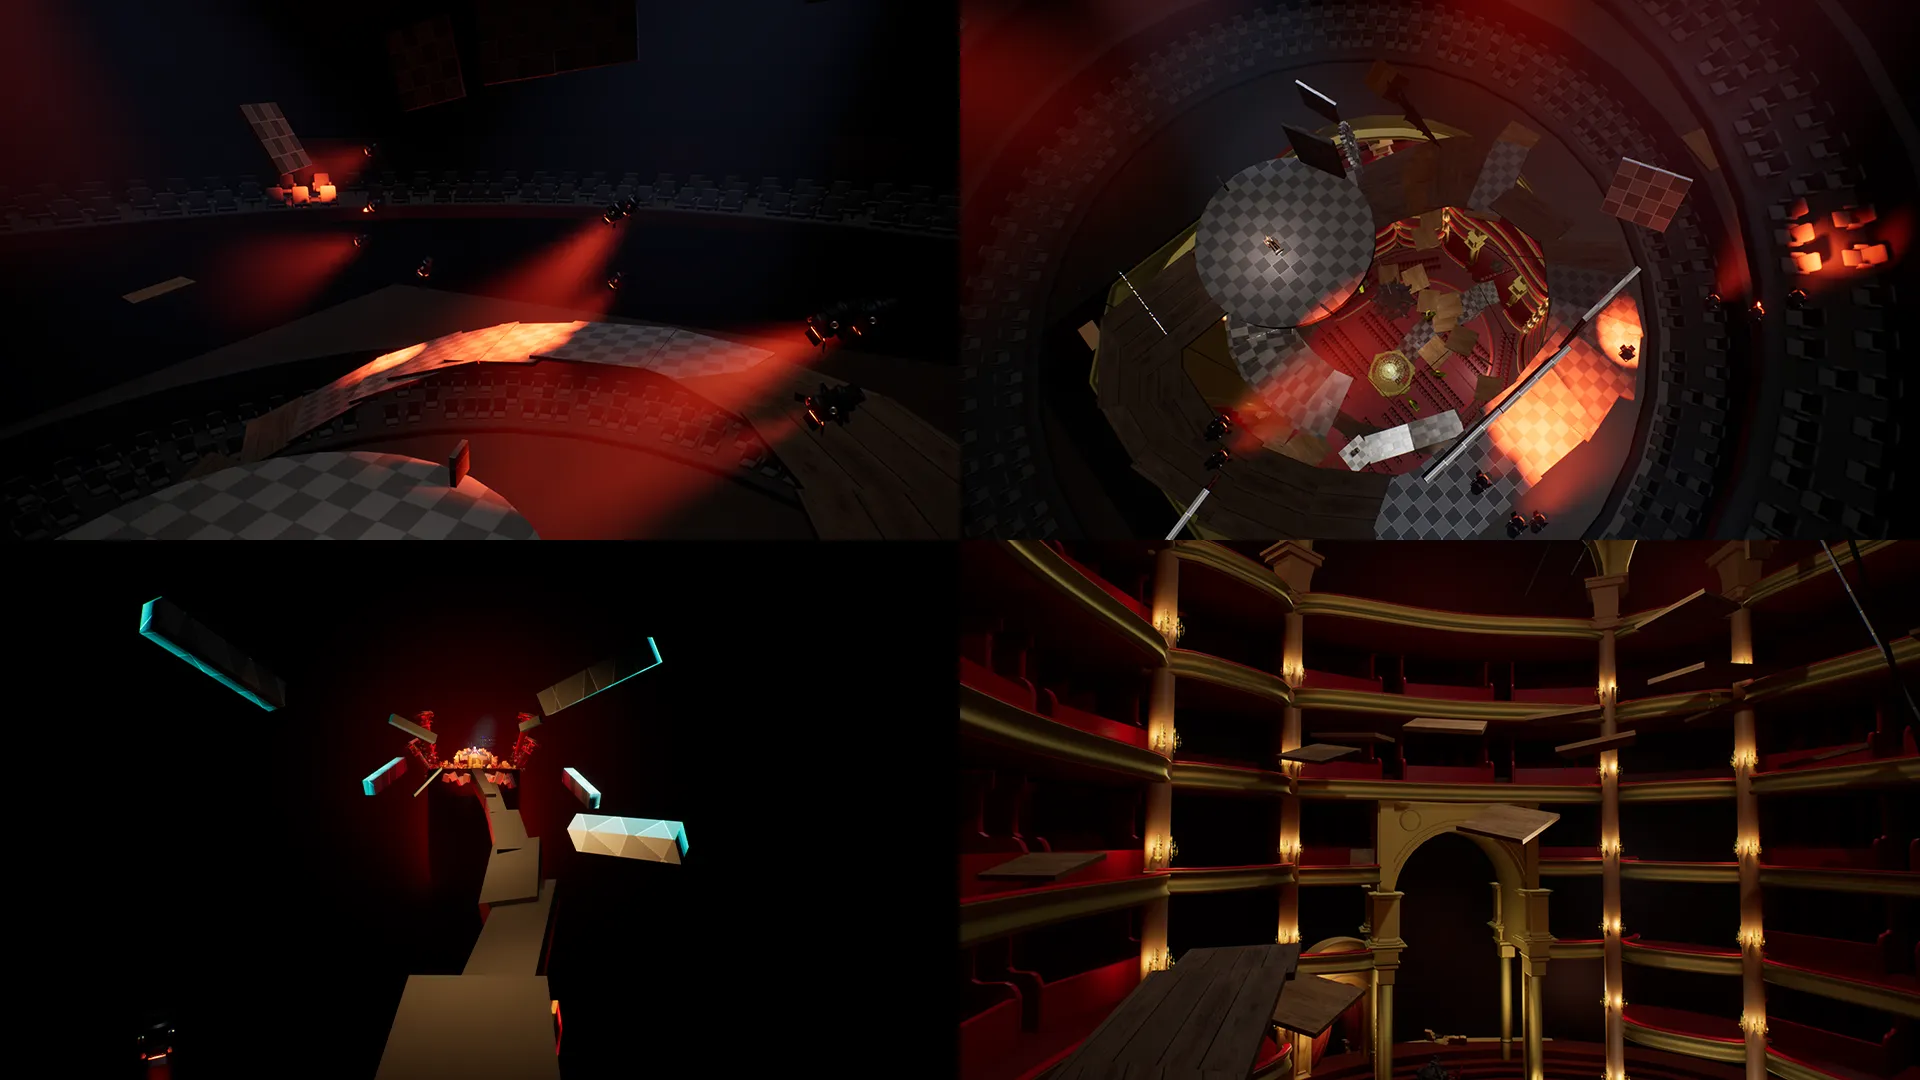
Look at old Act III from different angles.
This was a bit much to do, so we had to cut Act III as a separate level and place it at the end of Act II. What was done environment-wise was kept and we only kept the two best challenges design-wise.
“Floor Creation” is our code name for the main pathway during this section, with the floor appearing in front of the player à la Mario Galaxy. Mélina spent a lot of time to refine the path, the version in the game is probably the 14th… That’s how much we iterated.
“Undyne” is the last challenge in the game, inspired by Undyne’s mechanic in Undertale, you’re static in the middle of a circle while eyes target you from all directions, and you have to rotate a wheel to hide yourself from it.
You can do the entire thing by moving yourself and not rotating the wheel, but it’s on purpose. The Eyes’ animations were crafted to give each light a unique personality, and to have one permanent Eye that moves early and guides the player to block preemptively where the next danger’s coming.
This part can be very tense for first-time players, so cheating and making them block the lights before they’re even visible is necessary to make the game less frustrating.
Undyne sequence from another point of view. Notice how one Eye stays always visible and goes from left to right in advance before the real danger appears. This helps the players know where to place the blocking wall, even if subliminally.
5) Closing Remarks
Big one, huh?
There is still so much to talk about, I haven’t talked in-depth about the main mechanic, the pre-production gameplay concepts that were abandoned, Broken Ballroom, the 180° fakeout with rotating box… A lot of cut content.
But it’s already a very, very long article and I need to stop somewhere!
If you’ve read all this, thank you very much!! Means the world to me.
Stay tuned for my next projects, this site is not going anywhere anytime soon.
Take care, and see you later!